5 Easy Steps to Start Your Shopify Blog
So you’ve started your Shopify store and been told by various experts that starting a blog will help you achieve your first sale. (Or boost your current sales, if your store has been around for a bit.)
Starting a blog for your Shopify store is easy enough in concept, but can be a bit more daunting in action. How do you get started? What’s the first thing you should do? What do you write about?
Get MESA free for 7-days and enjoy support from automation experts!
Topics:
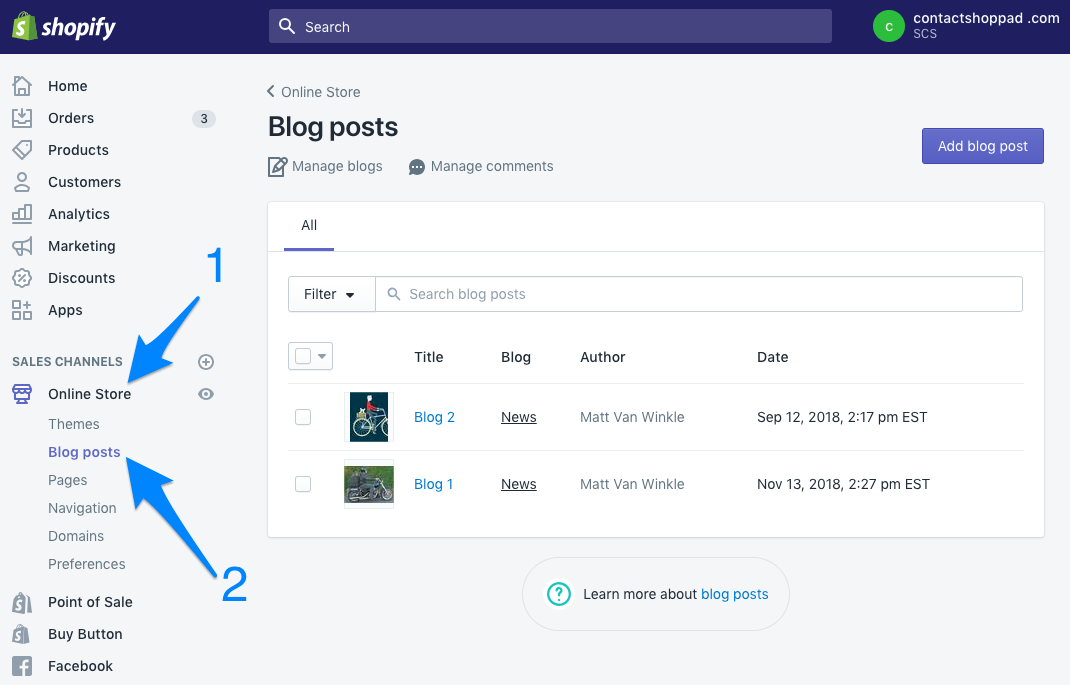
Step 1: Get familiar with the Shopify blog dashboard.
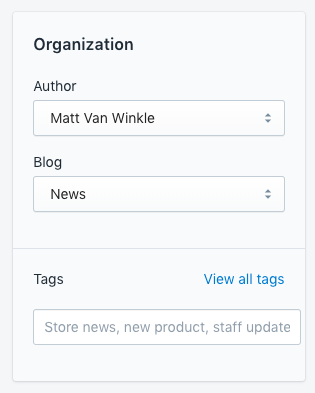
Good news! Shopify comes with blogging capabilities baked in. Check it out:

You’ve probably noticed that Shopify’s built-in blogging capabilities are, well, a tad basic. Many shop owners and writers find the native features to be limiting. If you fall into this category, you’ll want to add on a blog extension from the Shopify App Store. A blog app will add all sorts of components that the native blog does not have, from CTA buttons and author profiles to pricing and testimonials. Naturally, we recommend Blog Studio. You can try it free for 14 days. If you don’t like it, uninstall and you can still keep all your blog pages created on the app.
As you can see, you can make your blog into exactly what you need it to be with very little effort.
Step 2: Decide on a concept.
Now that you have the capability to blog, you’ll need to decide what exactly you want to blog about. As a Shopify store, you should create a blog that’s complementary to your products and adds value to your audience’s life. Most retailers create blogs about the lifestyle that goes along with their products. Here are a few examples:
- Sydney So Sweet, a children’s clothing company, blogs on ways to style your daughters and what to gift your parent friends.
- Au Lit Fine Linens, a bedding company, has a blog packed with all the information you could ever want on bedding, from how to get hotel-soft linens to the difference between a duvet and comforter, called Between the Sheets.
- Town Cutler, a cooking knives shop, has this wonderful blog focused on educating aspiring chefs on everything they’ll need to know about knives.
- Vinebox, a wine company using product subscription workflows, has this awesome blog on topics from what wines to pair with what food to how and when to decant your wine.
- BarkBox, a dog toy subscription company, has BarkPost, which covers literally every topic on dogs known to man. As a dog owner myself, I can’t tell you the number of times BarkPost has answered a question for me.
Spend some time thinking about what it is your customers would like to read (and would search for in Google) and then create a blog around it.
Step 3: Optimize for SEO.
It’s important to make sure that your blog as a whole is optimized for search engines (mostly Google) to rank. You will also want to make sure that every post you write is individually optimized. When first creating your blog, you need to:
- Make sure your navigation is clean.
- Ensure you don’t have content duplicated anywhere. (Search engines hate a copy/paste.)
- Fill in all the metadata. Write your blog a clear meta description and make sure it hits on one or more of the keywords you’d like the blog to rank for. (For instance, the DIY hardware blog would want to get “do it yourself” somewhere in that meta description.) Tag your post for various relevant keywords.

- Make certain your titles are all title tagged. That is, within the source code of your blog, all titles should appear within <title> </title>. Doing so allows your post to be indexed.
Step 4: Create a topic list and schedule.
Topic lists/schedules are key. They help you stay on track and make writing ultimately easier.
To make a topic list, you’ll want to do some research on keywords in your space, using a tool like the Google Keyword Planner. Such a tool can tell you how many people per month are searching relevant keywords, enabling you to design topics around these keywords. (Good for SEO!)
Once you’ve got an idea of how your relevant keywords are performing and what people are searching for, you can write up your list of topics. I always recommend designing your topic titles in the following formats:
- A listicle (“50 Ways to Wear a Hat”)
- How-tos (“How to Wear a Hat”)
- Why’s (“Why You Need to Wear a Hat”)
Titles formatted like so are highly clickable because they tell a reader exactly what information they’ll get from the post up-front.
Personally, I like to write my topic lists out for a full quarter, and since I publish weekly, that means I have to write 12 topics on my list. You must decide the frequency at which you will publish (no less than once per month), and then lay your topic list out for an amount of time you deem far enough in advance. After that, schedule your topics on the calendar and hold yourself to it.
When it comes to scheduling posts ahead of time, Shopify allows you to load your posts and schedule them for future publishing, as well. This is a must-use feature because it enables you to write a month’s (or more) worth of blog post, load ‘em up, schedule, and forget about it until promotion time.
Step 5: Write your first post
You’re now ready to write your first post! I would recommend following the helpful guidelines Dan Shewan sets out if you’ve never written anything before. Overall, just make sure to keep things very clear, straightforward, and use plenty of images.
Time to start promoting your blog!
Publishing the post is only half the work. Now you have to attract visitors. Overall, think of your blogging efforts like a snowball. At first, you’ll be doing quite a lot of work for very little return. You may not get any new customers and you may have very low readership. But over time, your blog will grow, just like a snowball does. It’s important to stay consistent and put in a high level of quality. You WILL see returns, it just may take some time. So that said, the sooner you start your blog, the better.


