How to Import Orders to Shopify Using CSV Files
Managing orders effectively is the backbone of any successful ecommerce business. Importing orders into Shopify often arises from specific needs, such as migrating data from another platform, consolidating orders from multiple sales channels, or handling bulk offline orders—think trade shows, phone sales, or in-person events.
While these tasks are essential, they can quickly become overwhelming when done manually. That’s where MESA comes in. By automating the order import process using FTP and CSV files, MESA helps you save time, reduce errors, and focus on growing your business.
In this article, you’ll learn how to seamlessly prepare a CSV file stored on an FTP server and set up an automated workflow to import your order data into Shopify. By the end, you’ll have a reliable, hands-free process for managing even the most complex order imports.
Get MESA today and automate your order imports from CSV files.
Topics:
Understanding CSV Order Imports in Shopify
CSV (Comma-Separated Values) files are a common format for importing data into Shopify, including products, customers, and orders. For businesses, importing orders via CSV is especially valuable when migrating from another platform, consolidating data from multiple sources, or handling bulk offline sales.
While CSV imports save time compared to manual entry, challenges like proper formatting, column mapping, and managing large datasets can complicate the process. Automation tools like MESA simplify this task with intuitive interfaces, pre-built templates, and error handling, making imports faster and more reliable.
Preparing your CSV file for import
CSV imports for Shopify simplify bulk order management by reducing manual entry and consolidating data. This ensures accurate records, better inventory control, and smoother order fulfillment, making it a reliable option for businesses without modern integrations.
Include required fields
To map your data accurately, ensure your CSV file includes these essential fields:
- email: The customer’s email address.
- line_items: Product details for each order.
- billing_address: Customer billing information.
Optional fields like discounts, tags, shipping addresses, and order_notes provide additional flexibility and context for your data. For clarity, use a sample CSV file as a reference.
Focus on accuracy
- Format Dates Correctly: Use the YYYY-MM-DD format for consistency.
- Save in UTF-8 Encoding: Prevent issues with special characters by using the correct encoding.
Stay organized
Maintain a clear file structure in your FTP folders and use descriptive file names (e.g., Orders_TradeShow_March2024.csv) for easy tracking and retrieval.
Step-by-step guide to importing orders to Shopify from a CSV file
Time needed: 3 minutes
Using FTP to import CSV files into Shopify streamlines order management by enabling accurate data processing and efficient handling of large datasets.
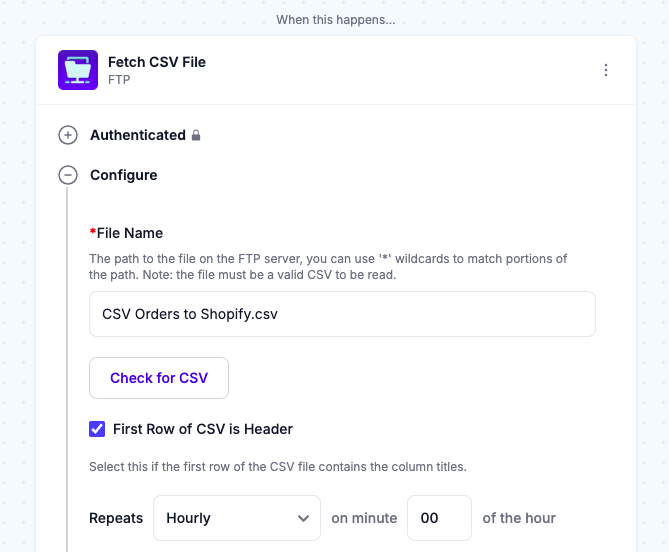
- Fetch the CSV file
The workflow begins by fetching a CSV file from your specified FTP server.

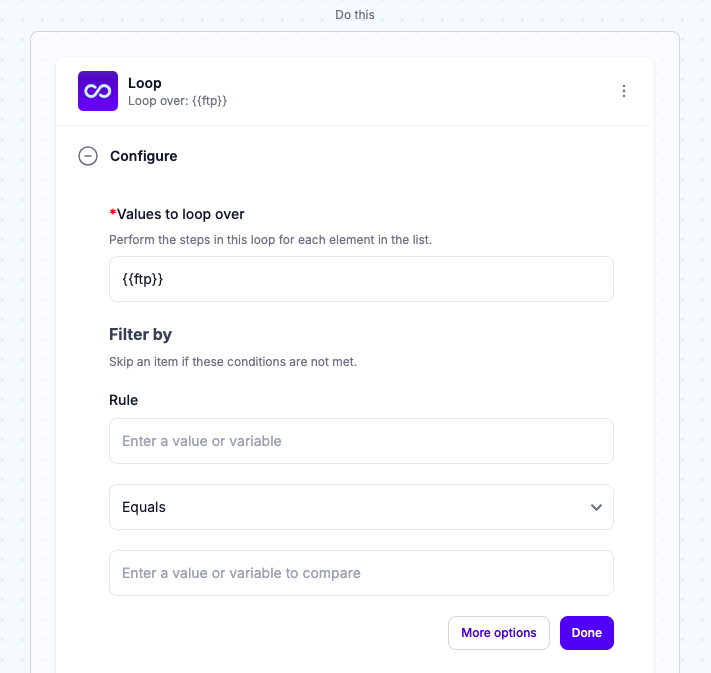
- Iterate through CSV rows
Each row in the CSV file is processed individually in a Loop step, allowing the workflow to handle each order as a separate record.

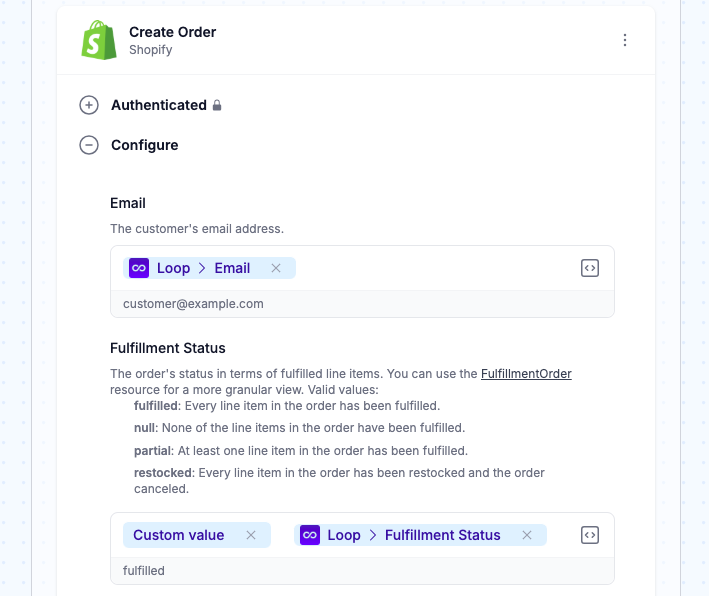
- Create a Shopify order
For each row, a new Shopify order is created with data from the CSV, populating fields like email, fulfillment status, line items, and addresses.

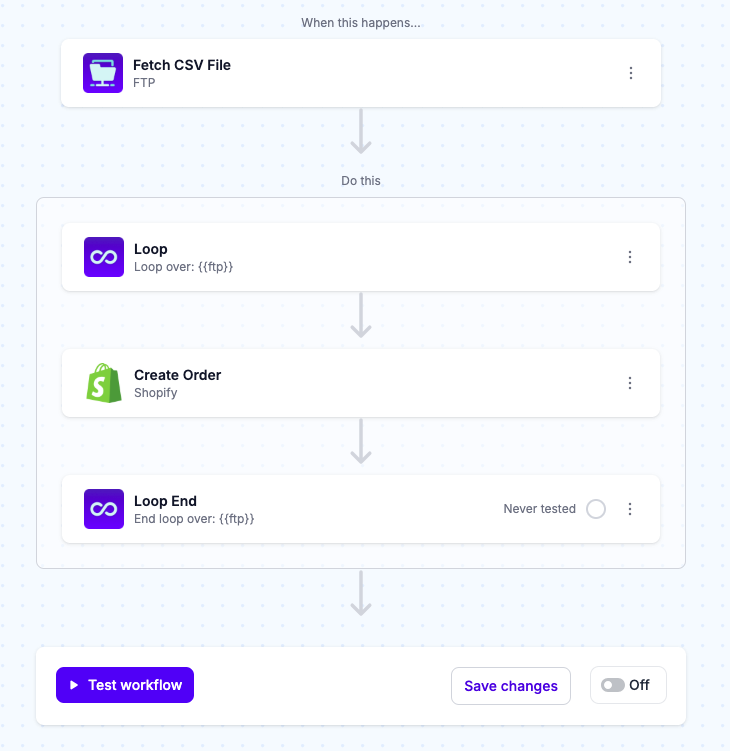
- Test, then turn “On”
Give your workflow a test run to confirm it’s ready, then turn it “On” to have it run on your set schedule.

Troubleshooting common issues with CSV order imports
Navigating CSV order imports can be challenging, especially when working with Shopify’s strict data requirements. These issues often stem from formatting errors, import failures, or data validation challenges. Below are common obstacles and how to address them effectively.
Format errors
Formatting discrepancies in your CSV file can disrupt the import process:
- Encoding Problems: Ensure the CSV file uses UTF-8 encoding to prevent data misinterpretation.
- Missing Fields: Shopify requires fields like order IDs, customer details, and product information. Verify that all critical columns are present and populated.
- Data Type Mismatches: Dates should follow ISO formatting, and currency values must have consistent decimal placement. Correct formatting ensures seamless imports.
Import failures
Technical issues can interrupt the transfer of data between your FTP server and Shopify:
- Data Validation Errors: Imports fail when data doesn’t meet Shopify’s criteria. Tools like Excel, OpenRefine, or CSV Lint can catch issues like missing fields, incorrect formats, or malformed rows before uploading.
By addressing these common issues, you can improve data integrity and ensure a smooth import process, enabling efficient order management on Shopify.
Conclusion
Managing data imports shouldn’t feel like a burden. It’s a critical part of keeping your Shopify store running smoothly—so that orders, customer details, and inventory align without the constant worry of errors or missing information. Automating these processes saves hours of manual effort, allowing you to focus on growing your business and delivering a better customer experience.
Tools like MESA streamline this by automating workflows for importing bulk orders, syncing inventory, and managing customer data. With a system in place to handle these tasks, you can move past repetitive operations and invest your time in strategies that scale your business.
Simplifying data imports isn’t just about saving time; it’s about building a solid foundation that allows your operations to adapt and grow, keeping you ready for the challenges and opportunities of ecommerce.
Frequently asked questions
If an order fails to import, check the MESA dashboard for error logs on issues like missing fields, incorrect formats, or mismatched field names. Make sure the source file is updated to meet Shopify’s requirements, including properly formatting required fields like order ID, product details, and customer information.
Review your CSV files for errors like missing fields or incorrect formats, and verify they align with Shopify’s requirements for field names, data types, and formatting. Tools like OpenRefine, Flatfile, or CSV Lint can automate these checks, and testing small batches before full imports helps catch potential issues early.
While Shopify’s API handles data effectively, breaking large datasets into smaller batches and scheduling imports thoughtfully can enhance processing. For best results, keep each batch to 10,000 records or fewer.


