How To Write Shopify Product Meta Descriptions Using ChatGPT
Prepare for a game-changing workflow solution that will change your approach to crafting Shopify product meta descriptions. This step-by-step tutorial seamlessly combines the power of ChatGPT, the convenience of Google Sheets, and the robustness of Shopify.
We’ll demonstrate how to leverage OpenAI artificial intelligence to generate compelling meta descriptions with ease. To ensure quality control and streamline the approval process, we’ll also cover the integration of Google Sheets as an intermediate step, allowing you to review and approve generated text prior to saving it on your Shopify product pages.
So, gear up for an innovative and time-saving technique that will empower you to optimize your ecommerce operations like never before.
Topics:
Watch the workflow tutorial video
Step-by-step workflow instructions
Time needed: 10 minutes
We’ll walk through making two workflows. The first will take the Title and Description of a newly created product in Shopify, prompt ChatGPT to write a meta description then save the result to Google Sheets.
The second workflow will run on a daily schedule to loop through the Google Sheets doc, and based on a Status column change, will take the meta description and then update the product in Shopify.
To get started, be sure to add MESA to your Shopify store before starting.
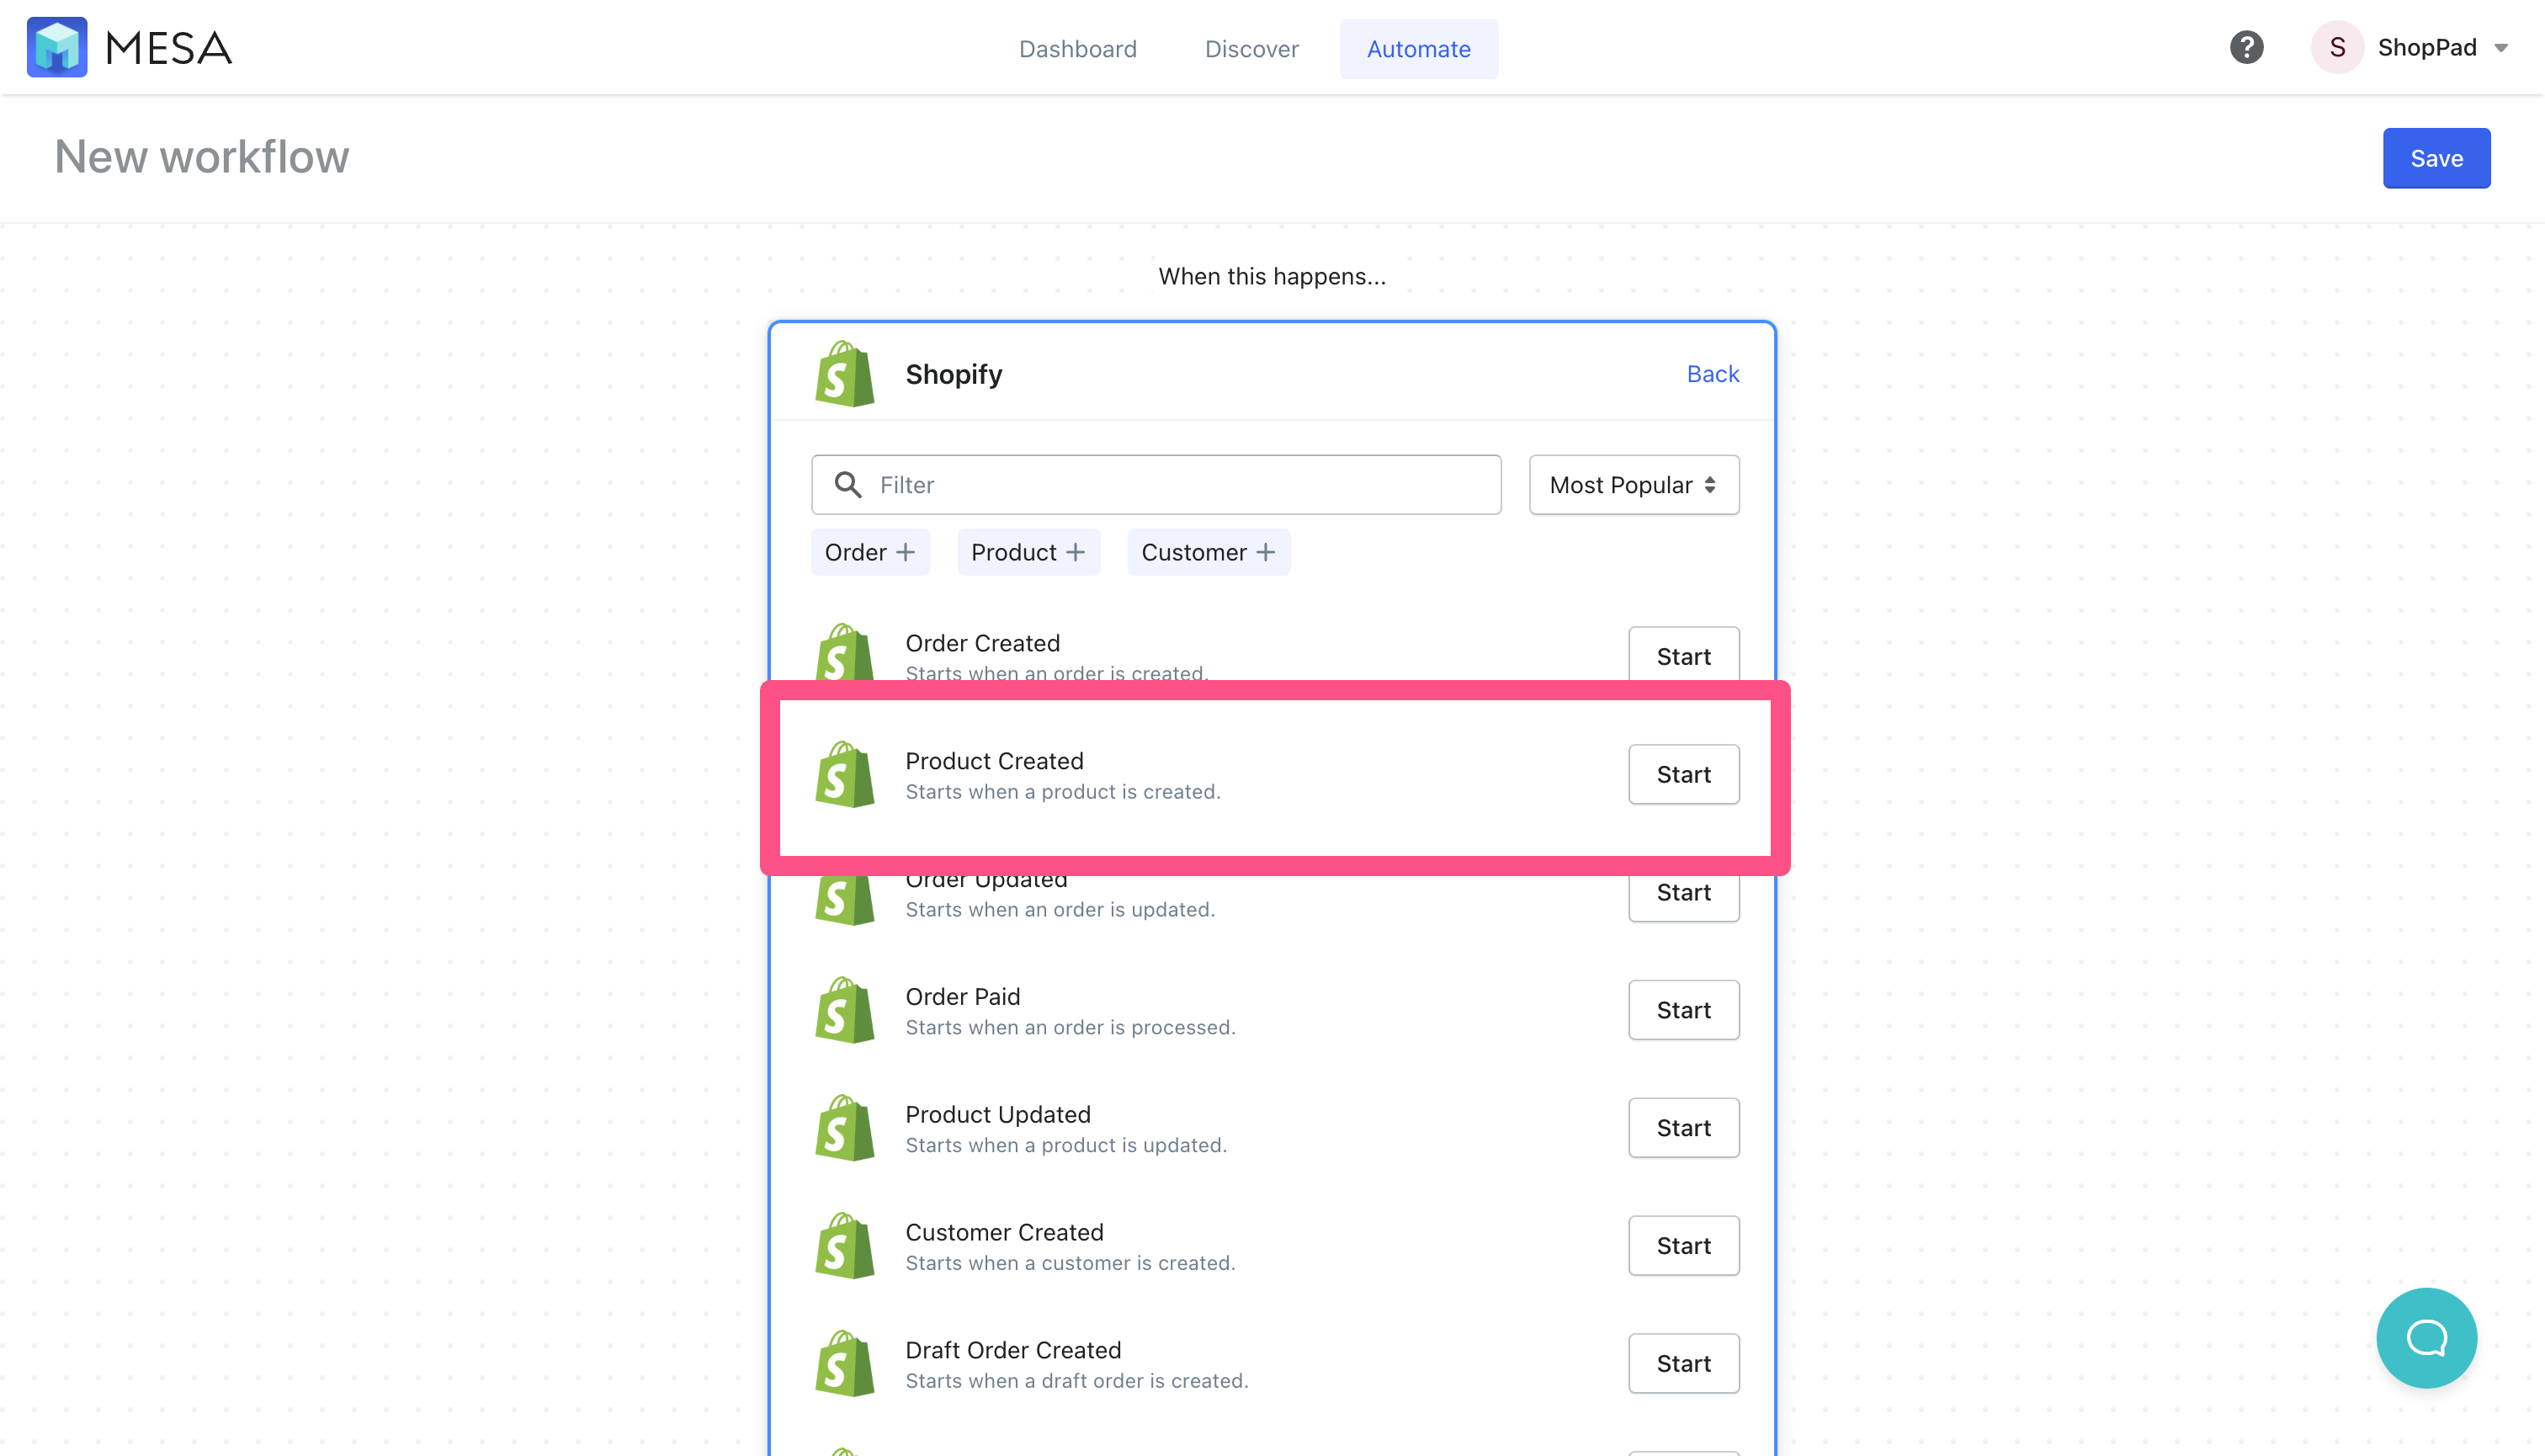
- First, start a new workflow using Shopify then, select the Product Created trigger event.
When creating a workflow from scratch, choose the Shopify app to get started. Then use the search fields to locate the Product Created event from the list.
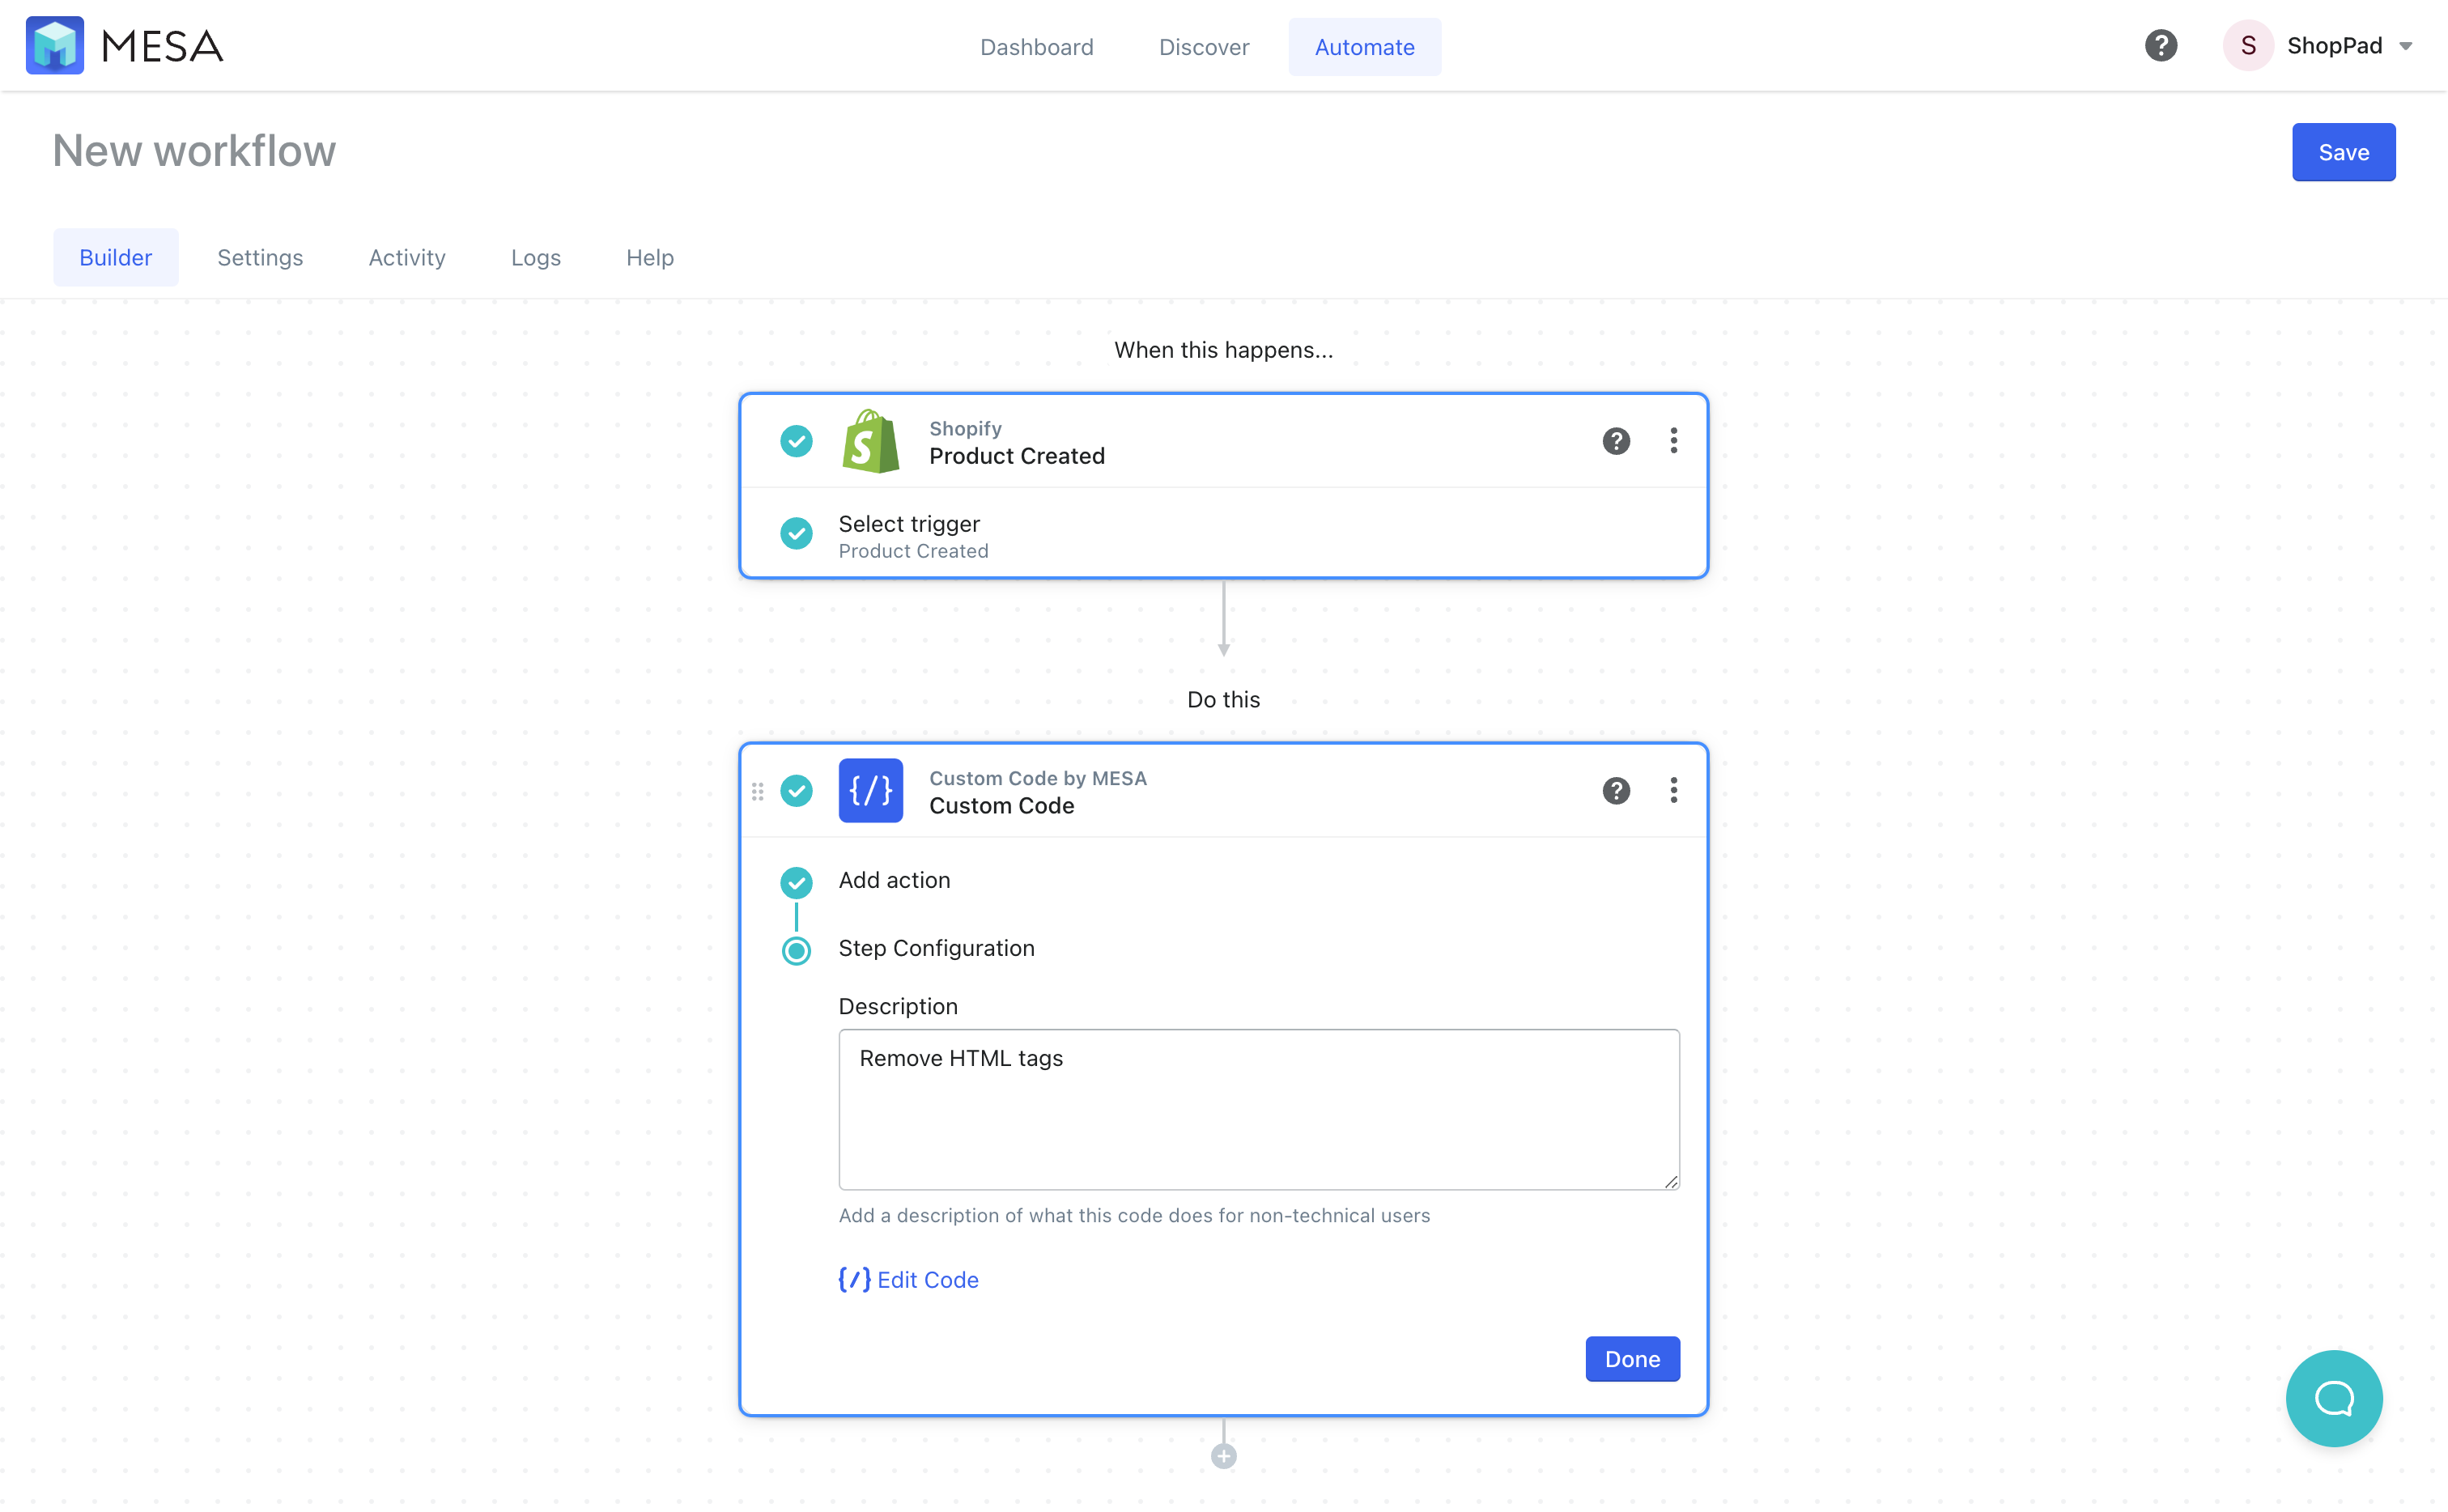
- Next, add the Custom Code app
In the description field, add the comment “Remove HTML tags” so you’ll remember what this does later.
- Add this code snippet in the Code Editor
Now, click the “Edit Code” link to enter the code editor. Where you see the comment “Add your custom code here” paste the following snippet:
Mesa.log.info("payload: ", payload.body_html);
payload.body_text = payload.body_html.replace(/<\/?[^>]+>/gi, '');
Mesa.log.info("body text: ", payload.body_text);
When you’re done, be sure to Save your changes then, exit the code editor.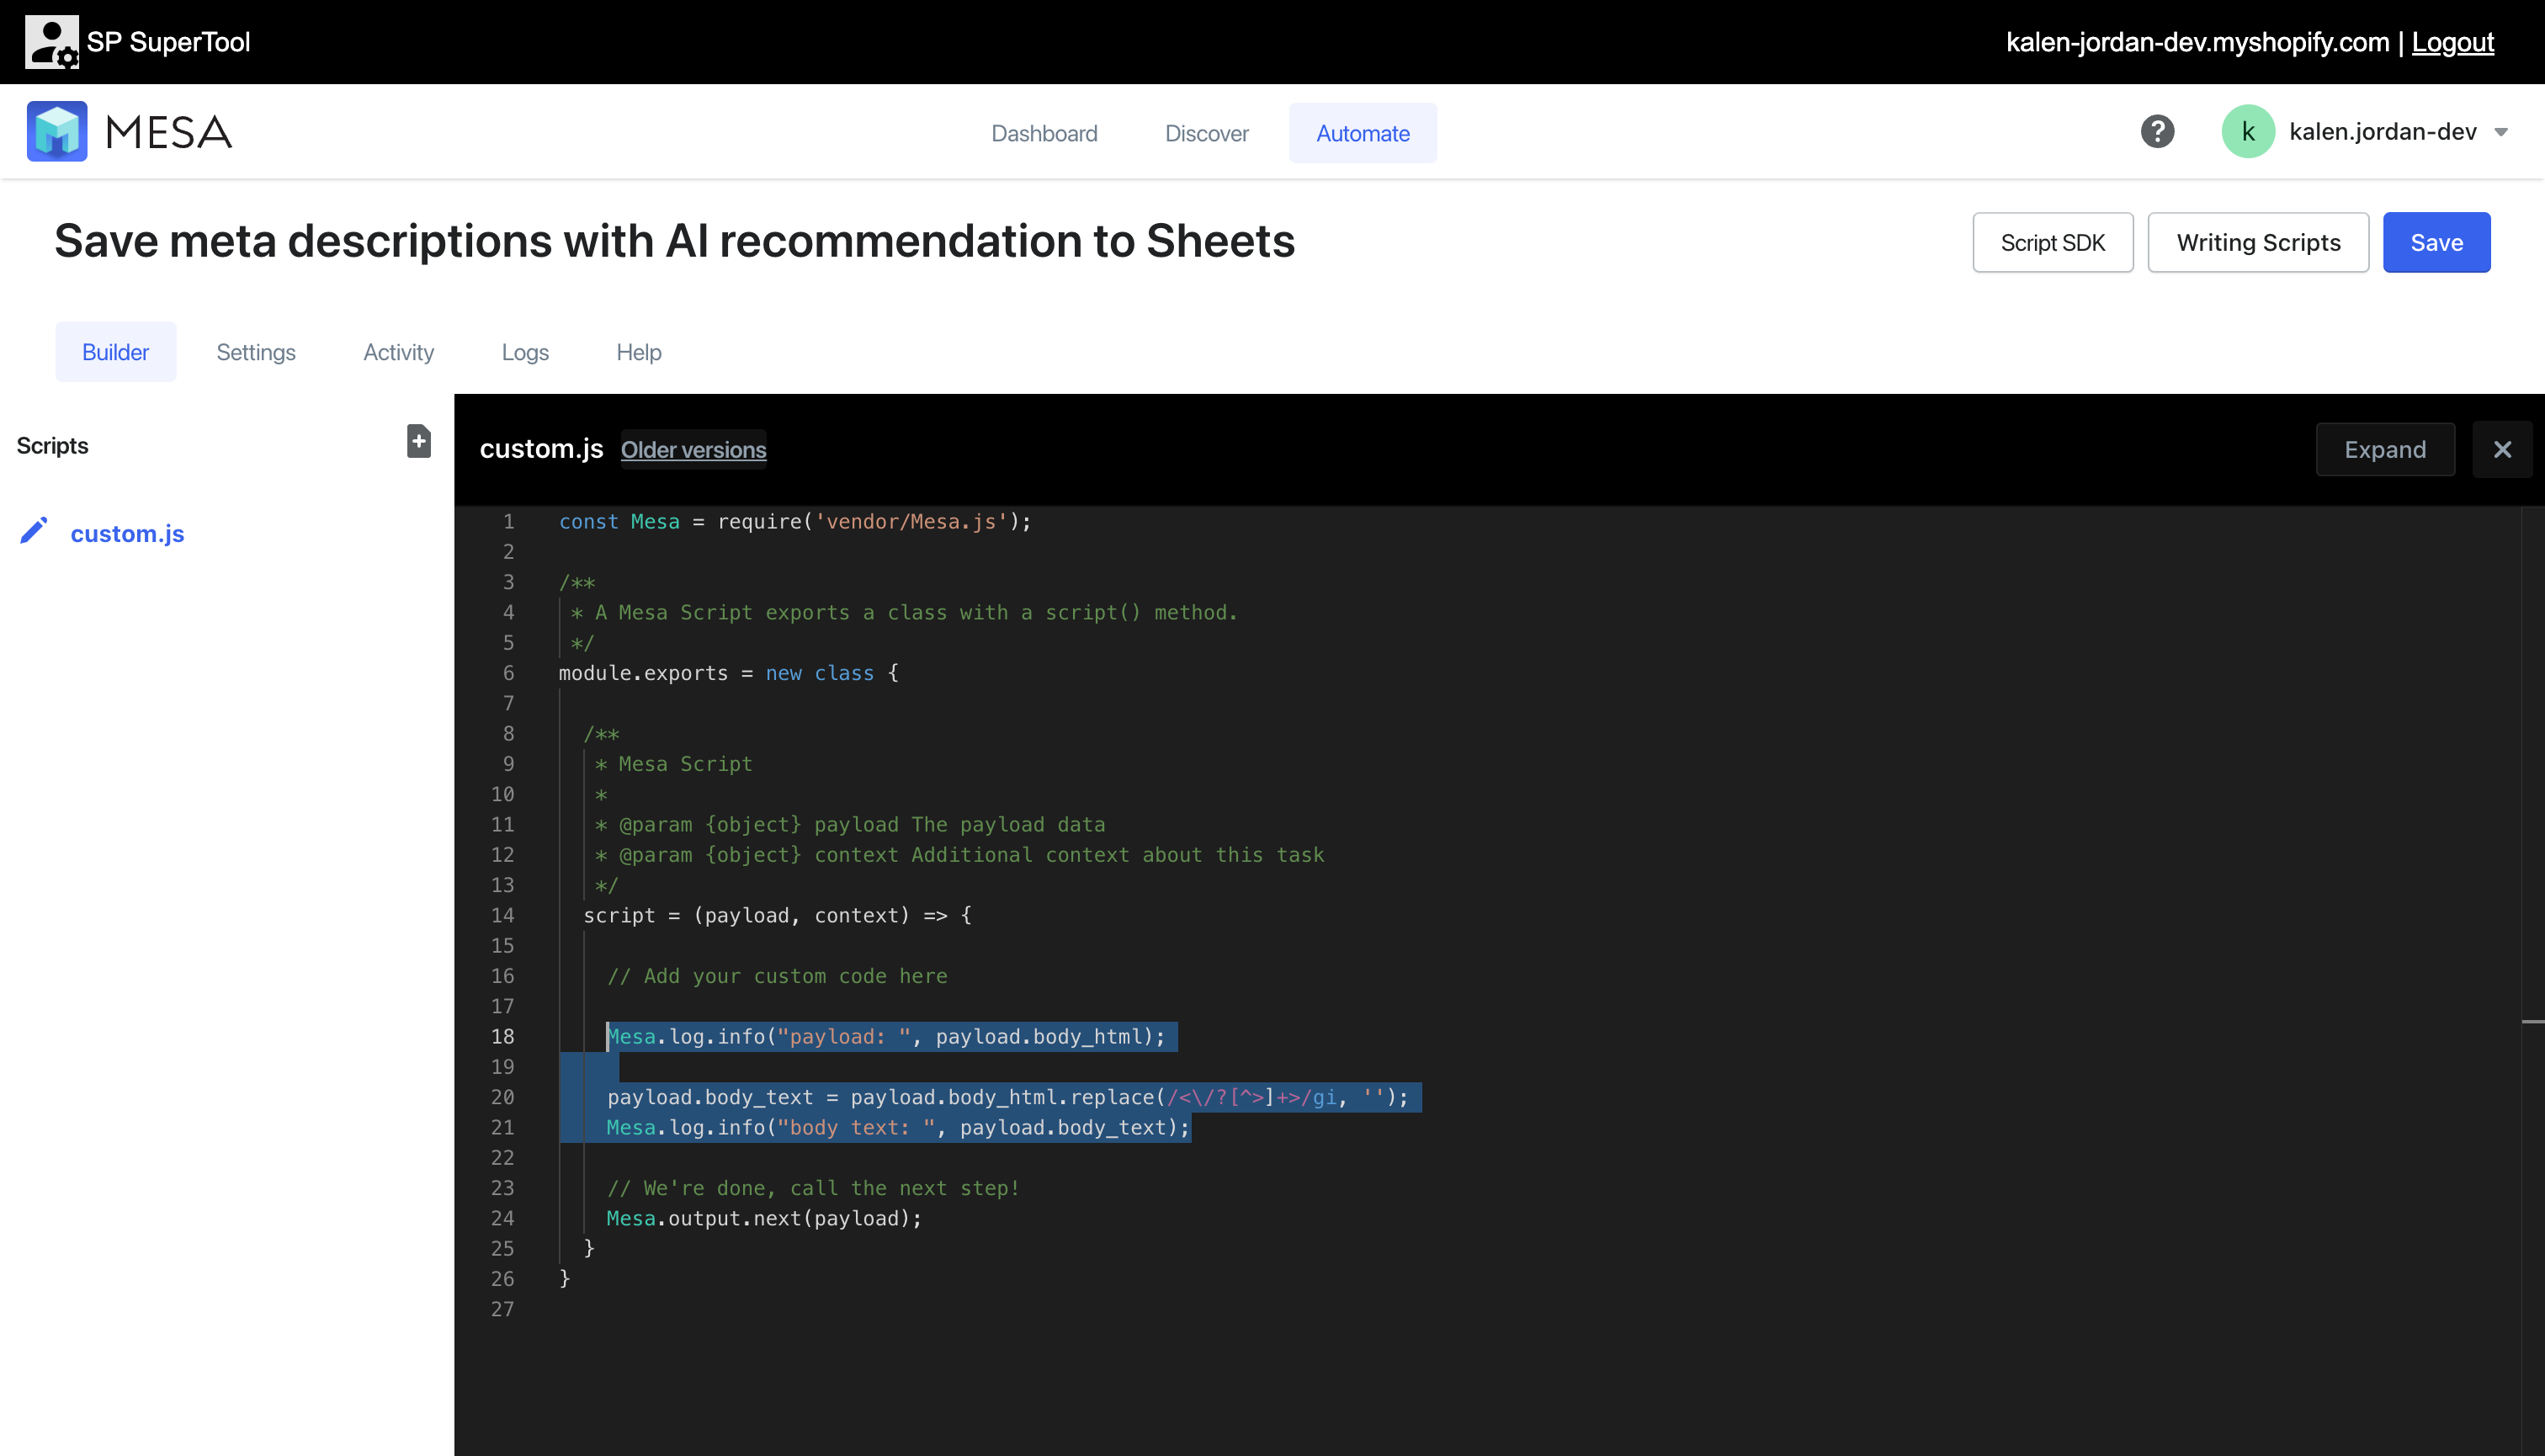
- Next, add the Shopify “Retrieve Product Metafields” action to your workflow
Under the Step Configuration section, add the
Product Created > IDvariable. Then specify the Namespace asglobaland the Key asdescription_tag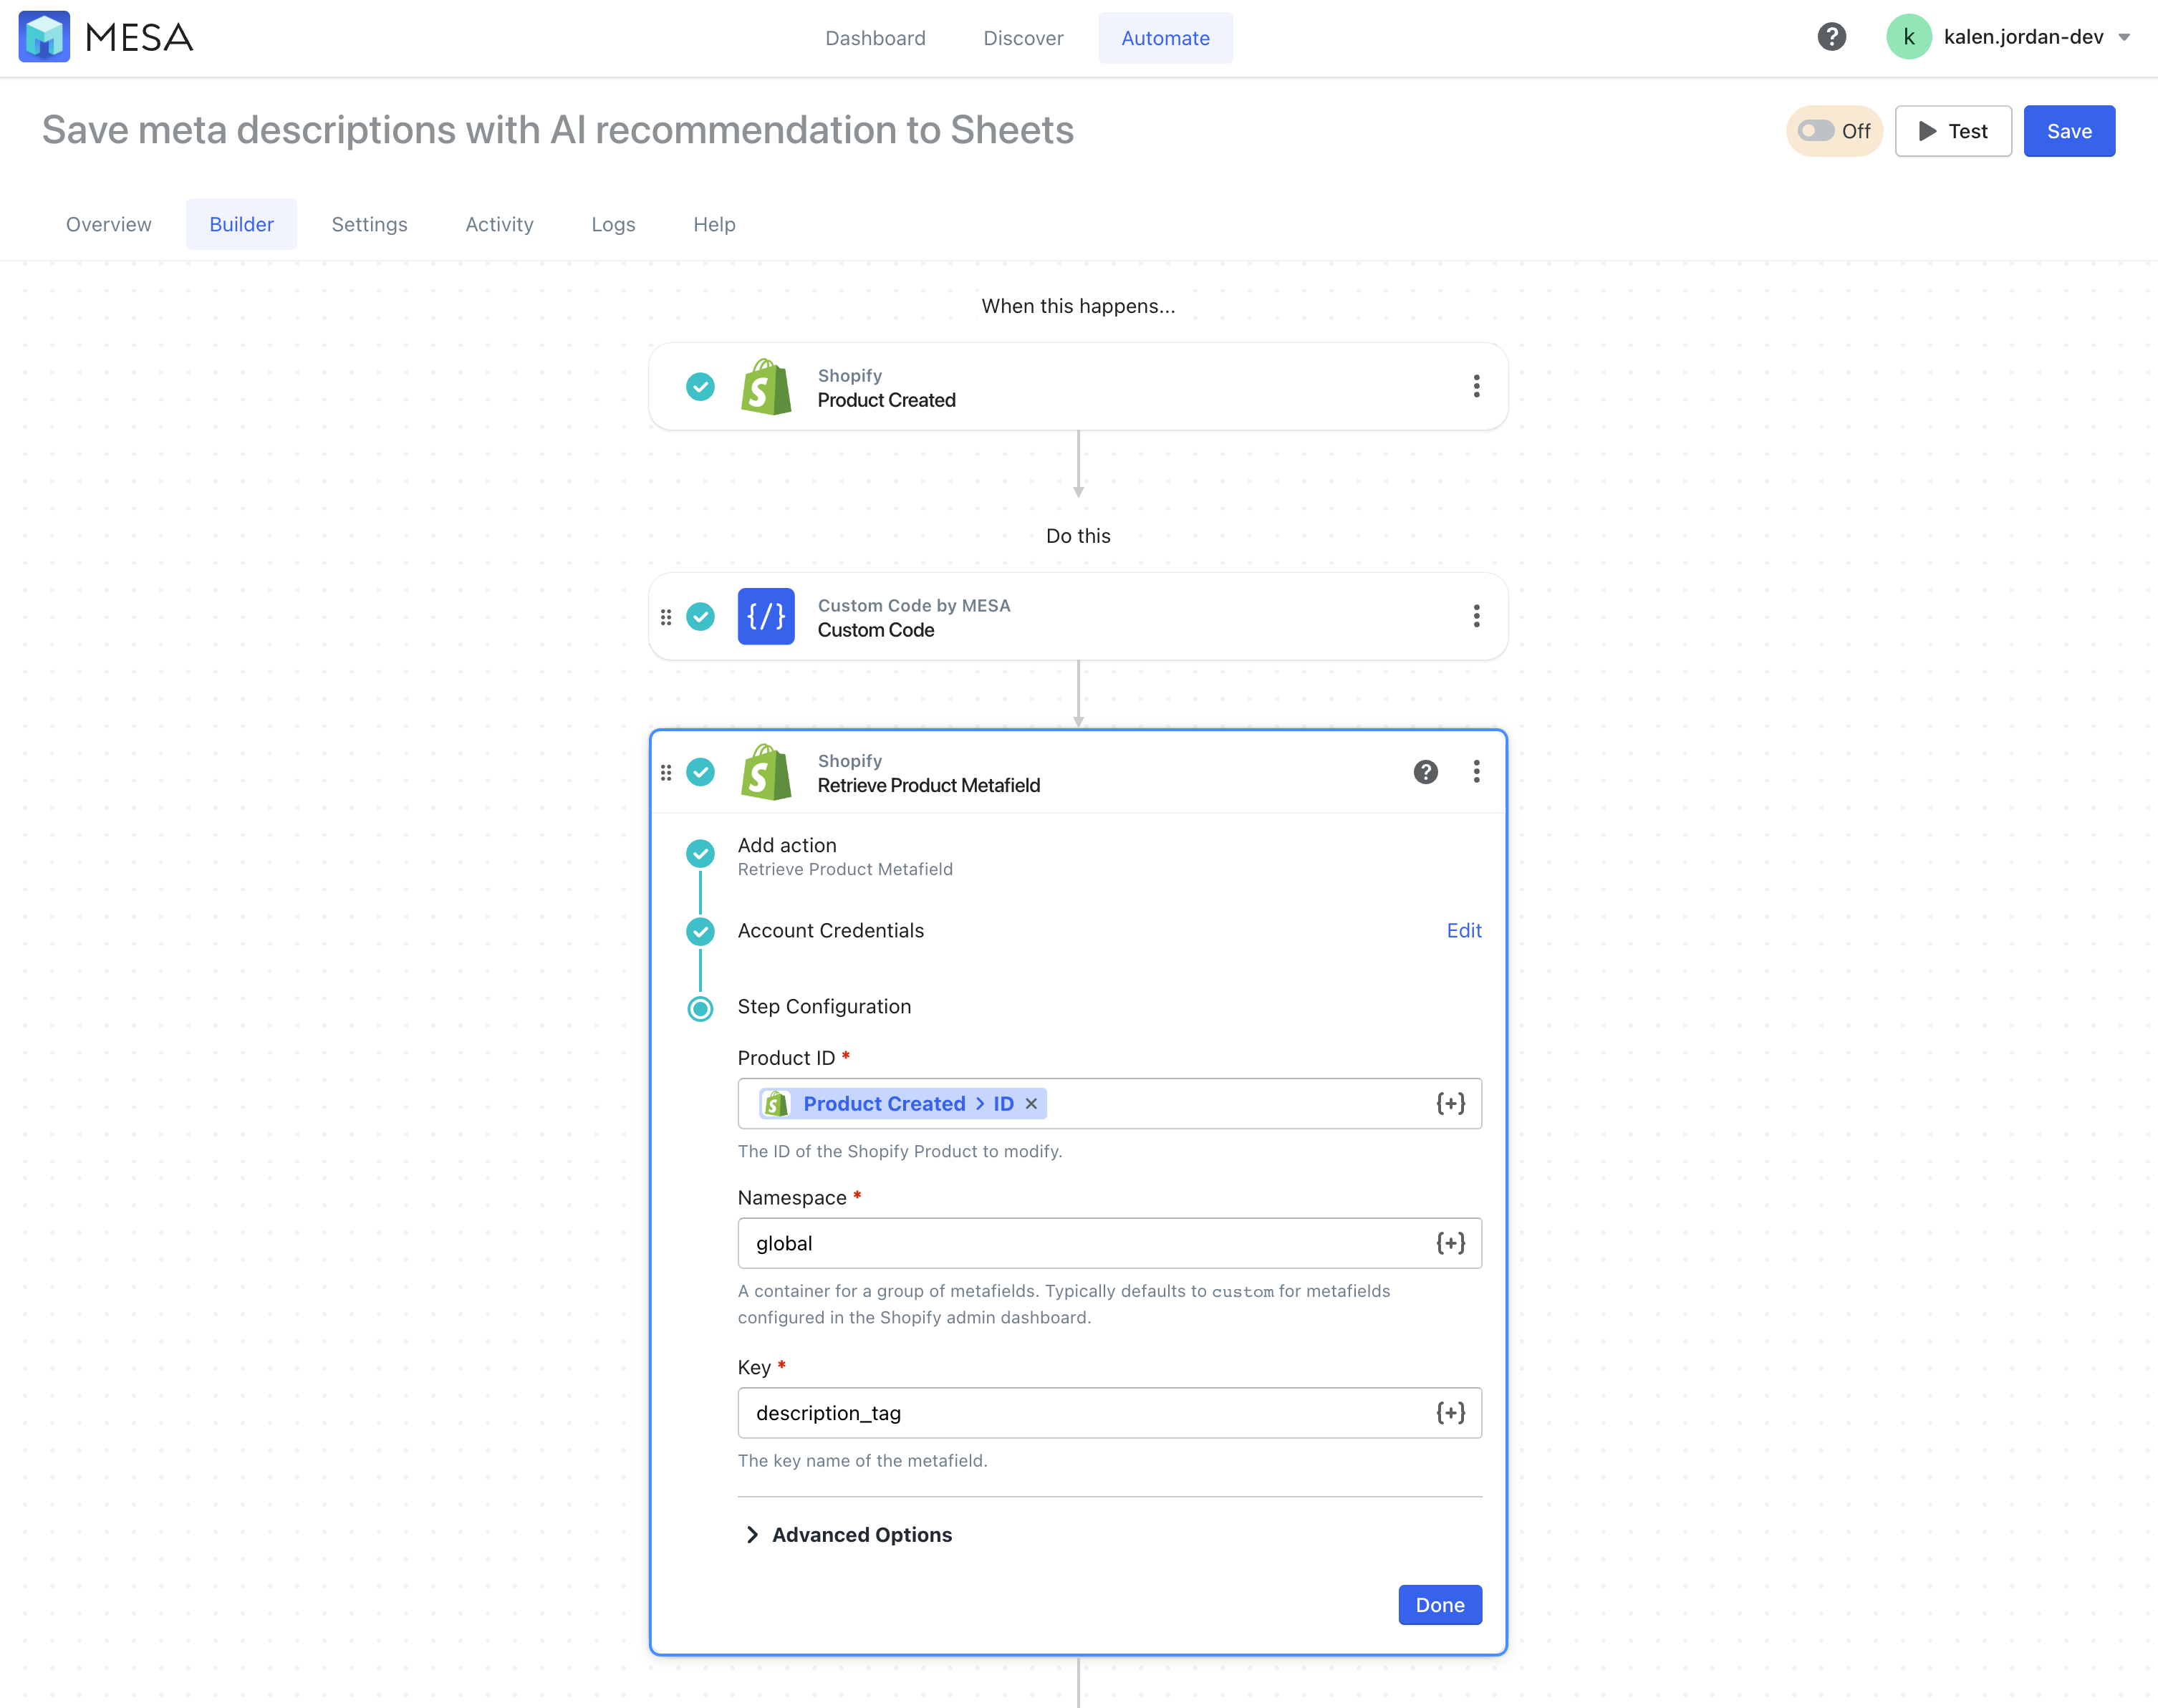
- Next, add ChatGPT to your workflow
Be sure to authenticate ChatGPT with your OpenAI API key if this is your first time. Following the instructions to acquire your API key.
Then, click the Add Message button and paste the following prompt in the “Content” field:Write an SEO optimized meta description that is a max of 160 characters for the following product:
Title: {{shopify.title}}
Description: {{custom.body_text}}
The{{shopify.title}is a variable that comes from the original Shopify Product Created step. The{{custom.body_text}}variable comes from the Custom Code step so the text is cleaner for the AI.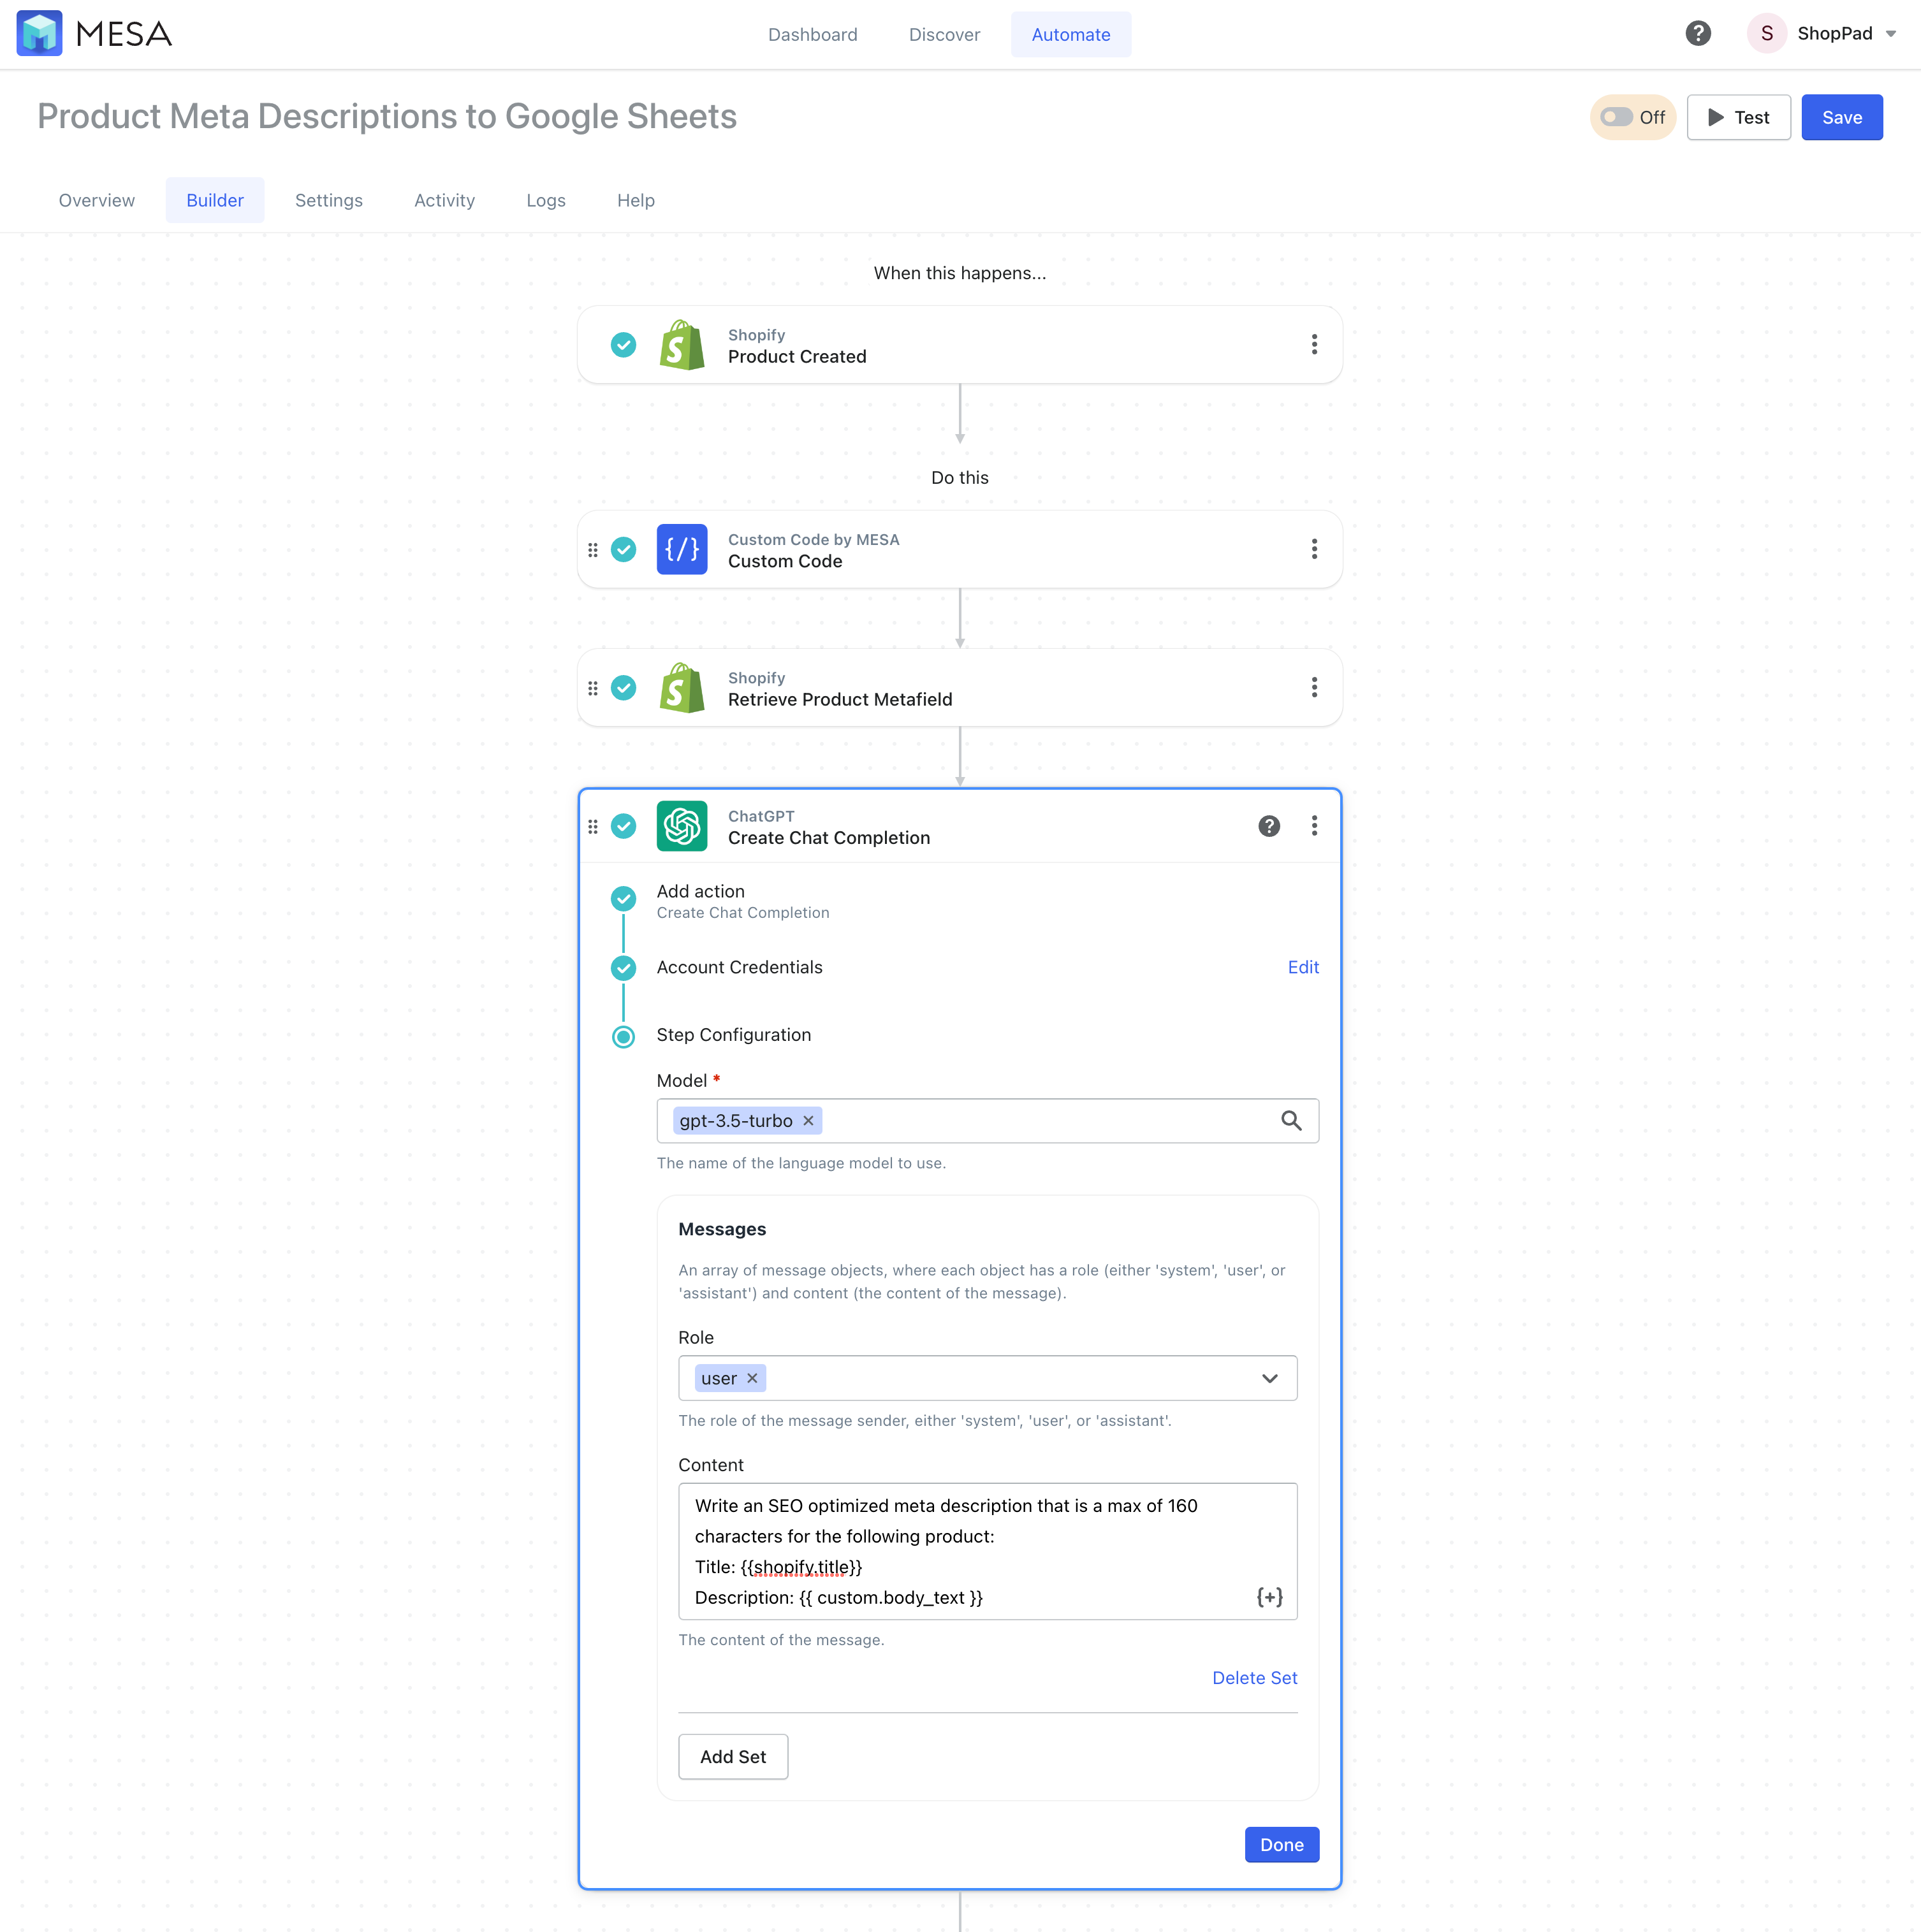
- Next, add the Google Sheets, Create Row action
Be sure to authenticate Google Sheets if this is your first time.
Then, we’ll create a new spreadsheet file called “Product Meta Descriptions”. Click Create Spreadsheet when you’re ready.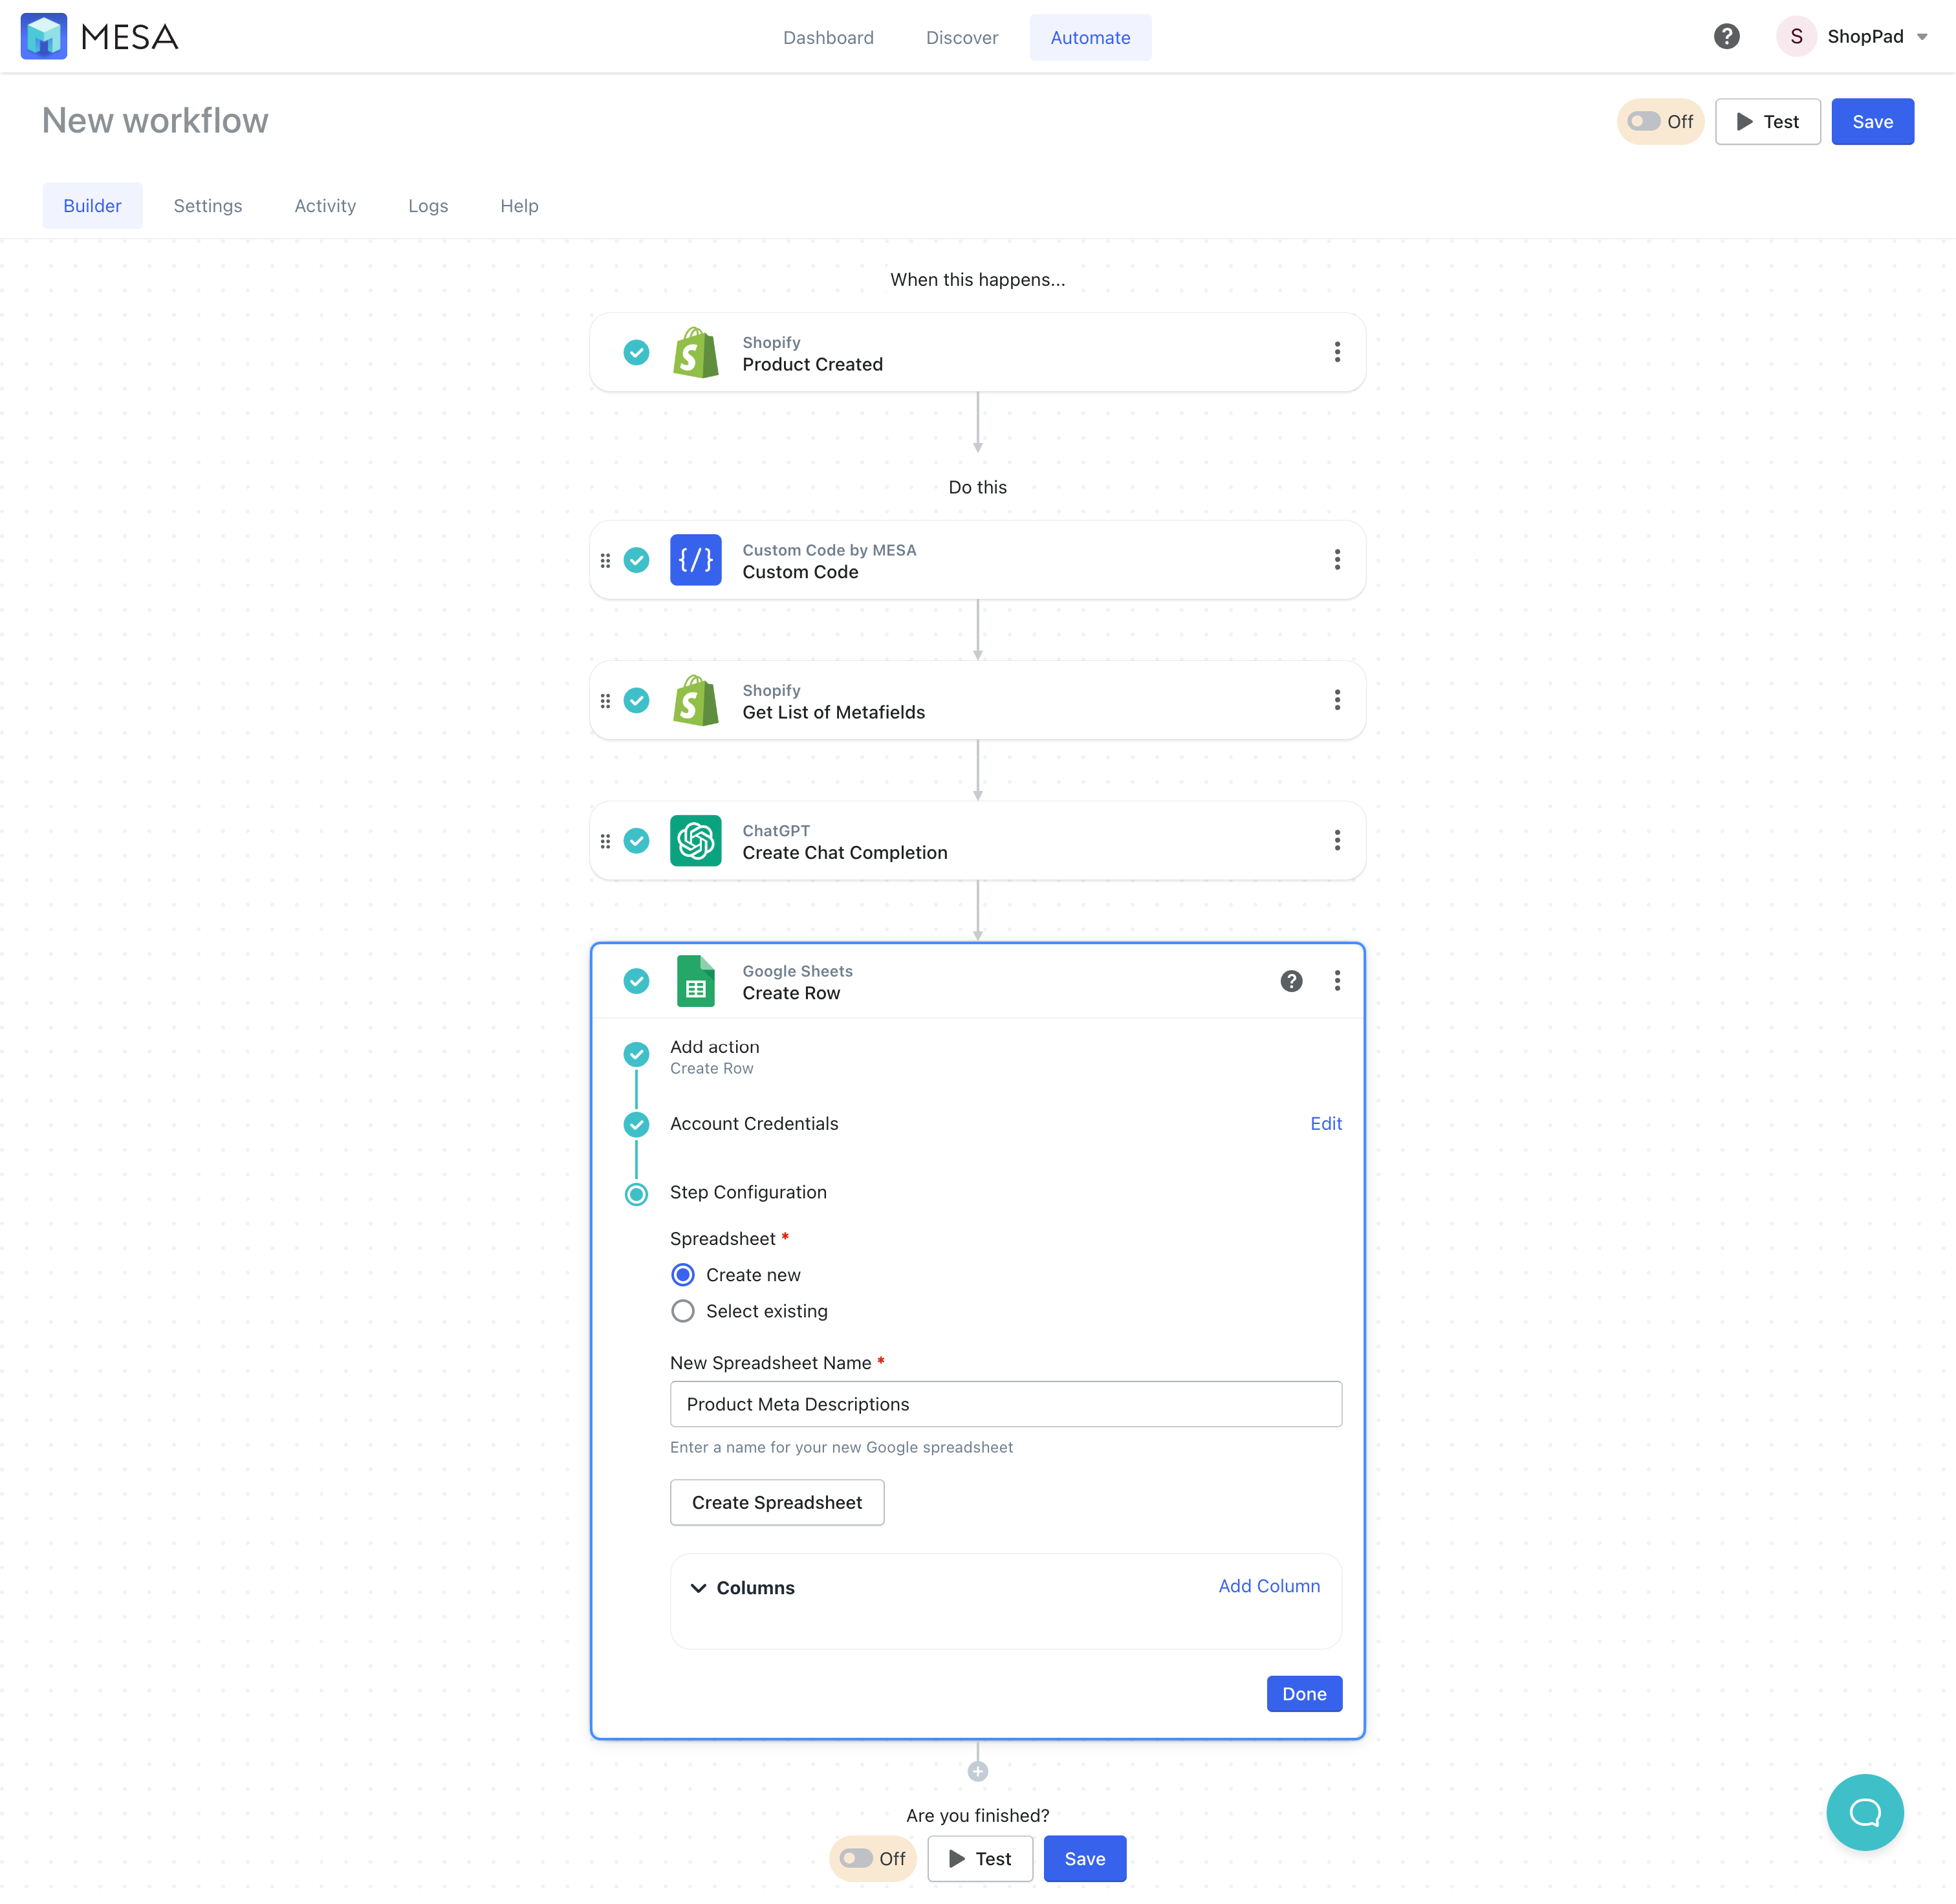
- Add Columns to your new Google Sheets spreadsheet
Click the Add Column link to make spreadsheet columns for the following:
ID –>{{shopify.id}}
Name –>{{shopify.title}}
Meta Description –>{{shopify_2.value}}
Description –>{{shopify.body_html}}
AI Meta Description –>{{chatgpt.choices[0].message.content}}
You can also use the {+} icon on each field to open the Variable Selector to find these values manually.
Then, when you’re ready, be sure to Save then, name your workflow some unique. Turn this workflow On to enable it.
Important: You’ll want to run a test to be sure everything is coming over to Google Sheets correctly. Having a single row in your spreadsheet will also help your efforts in the next workflow needed.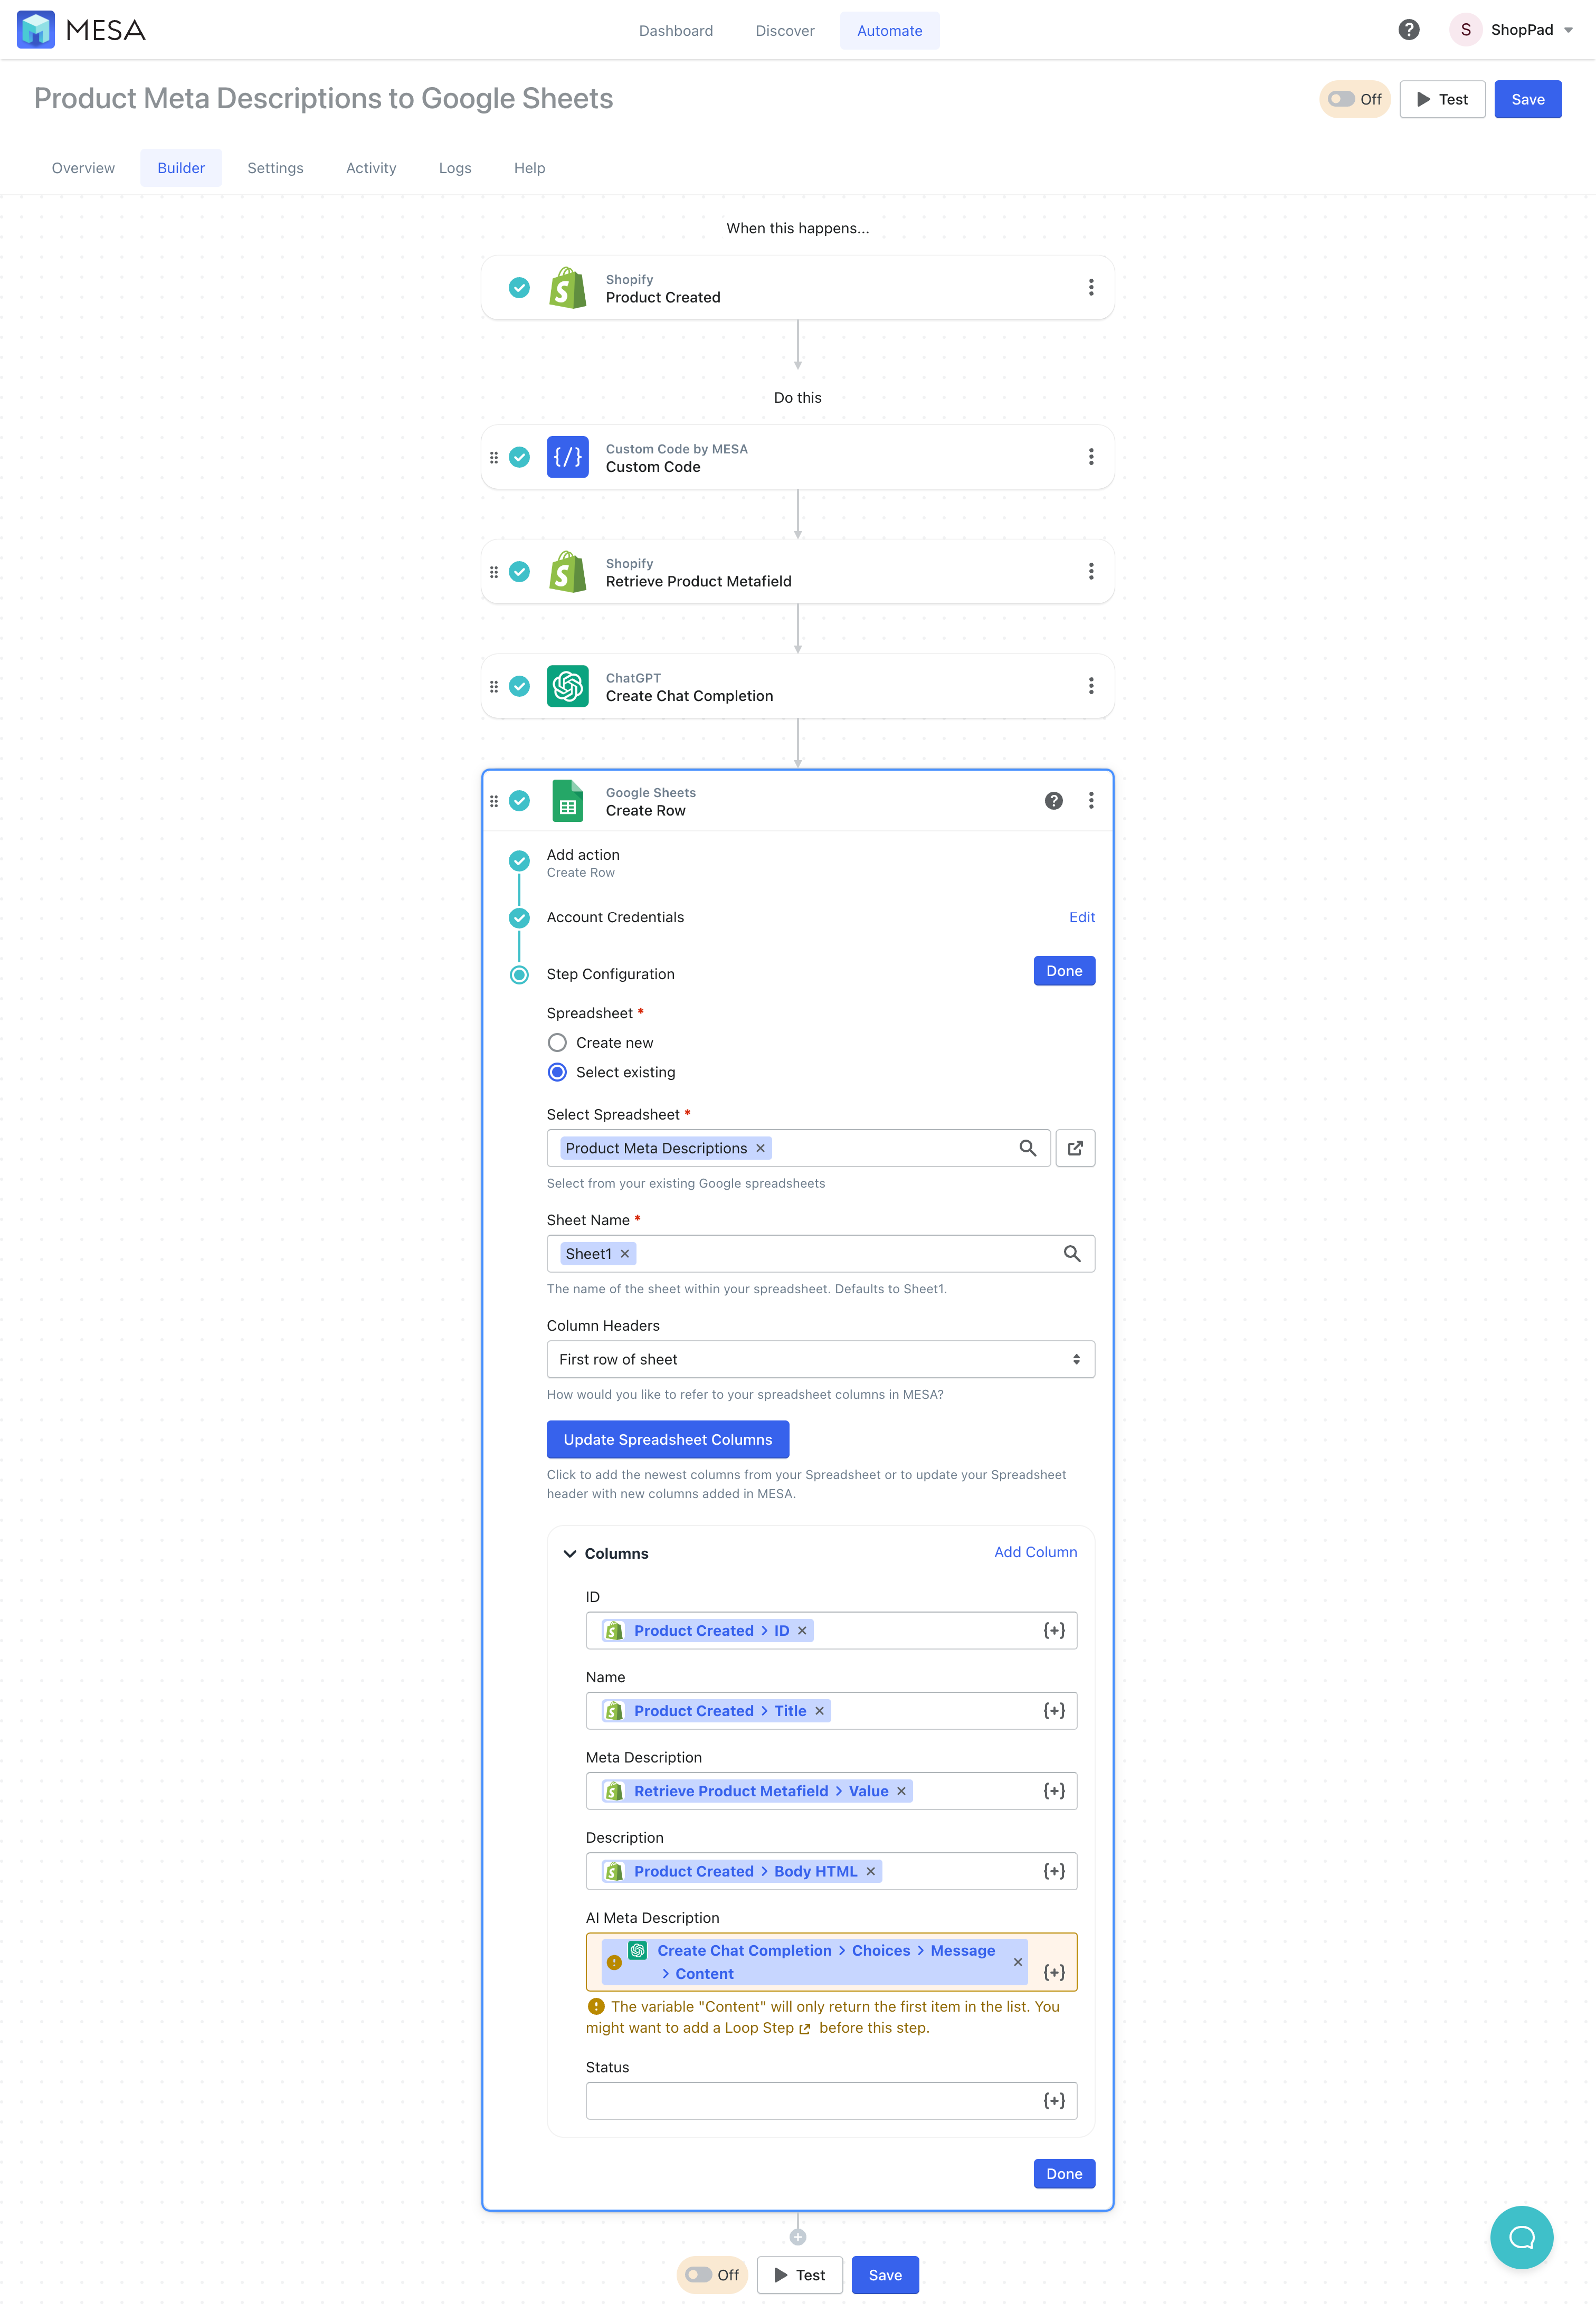
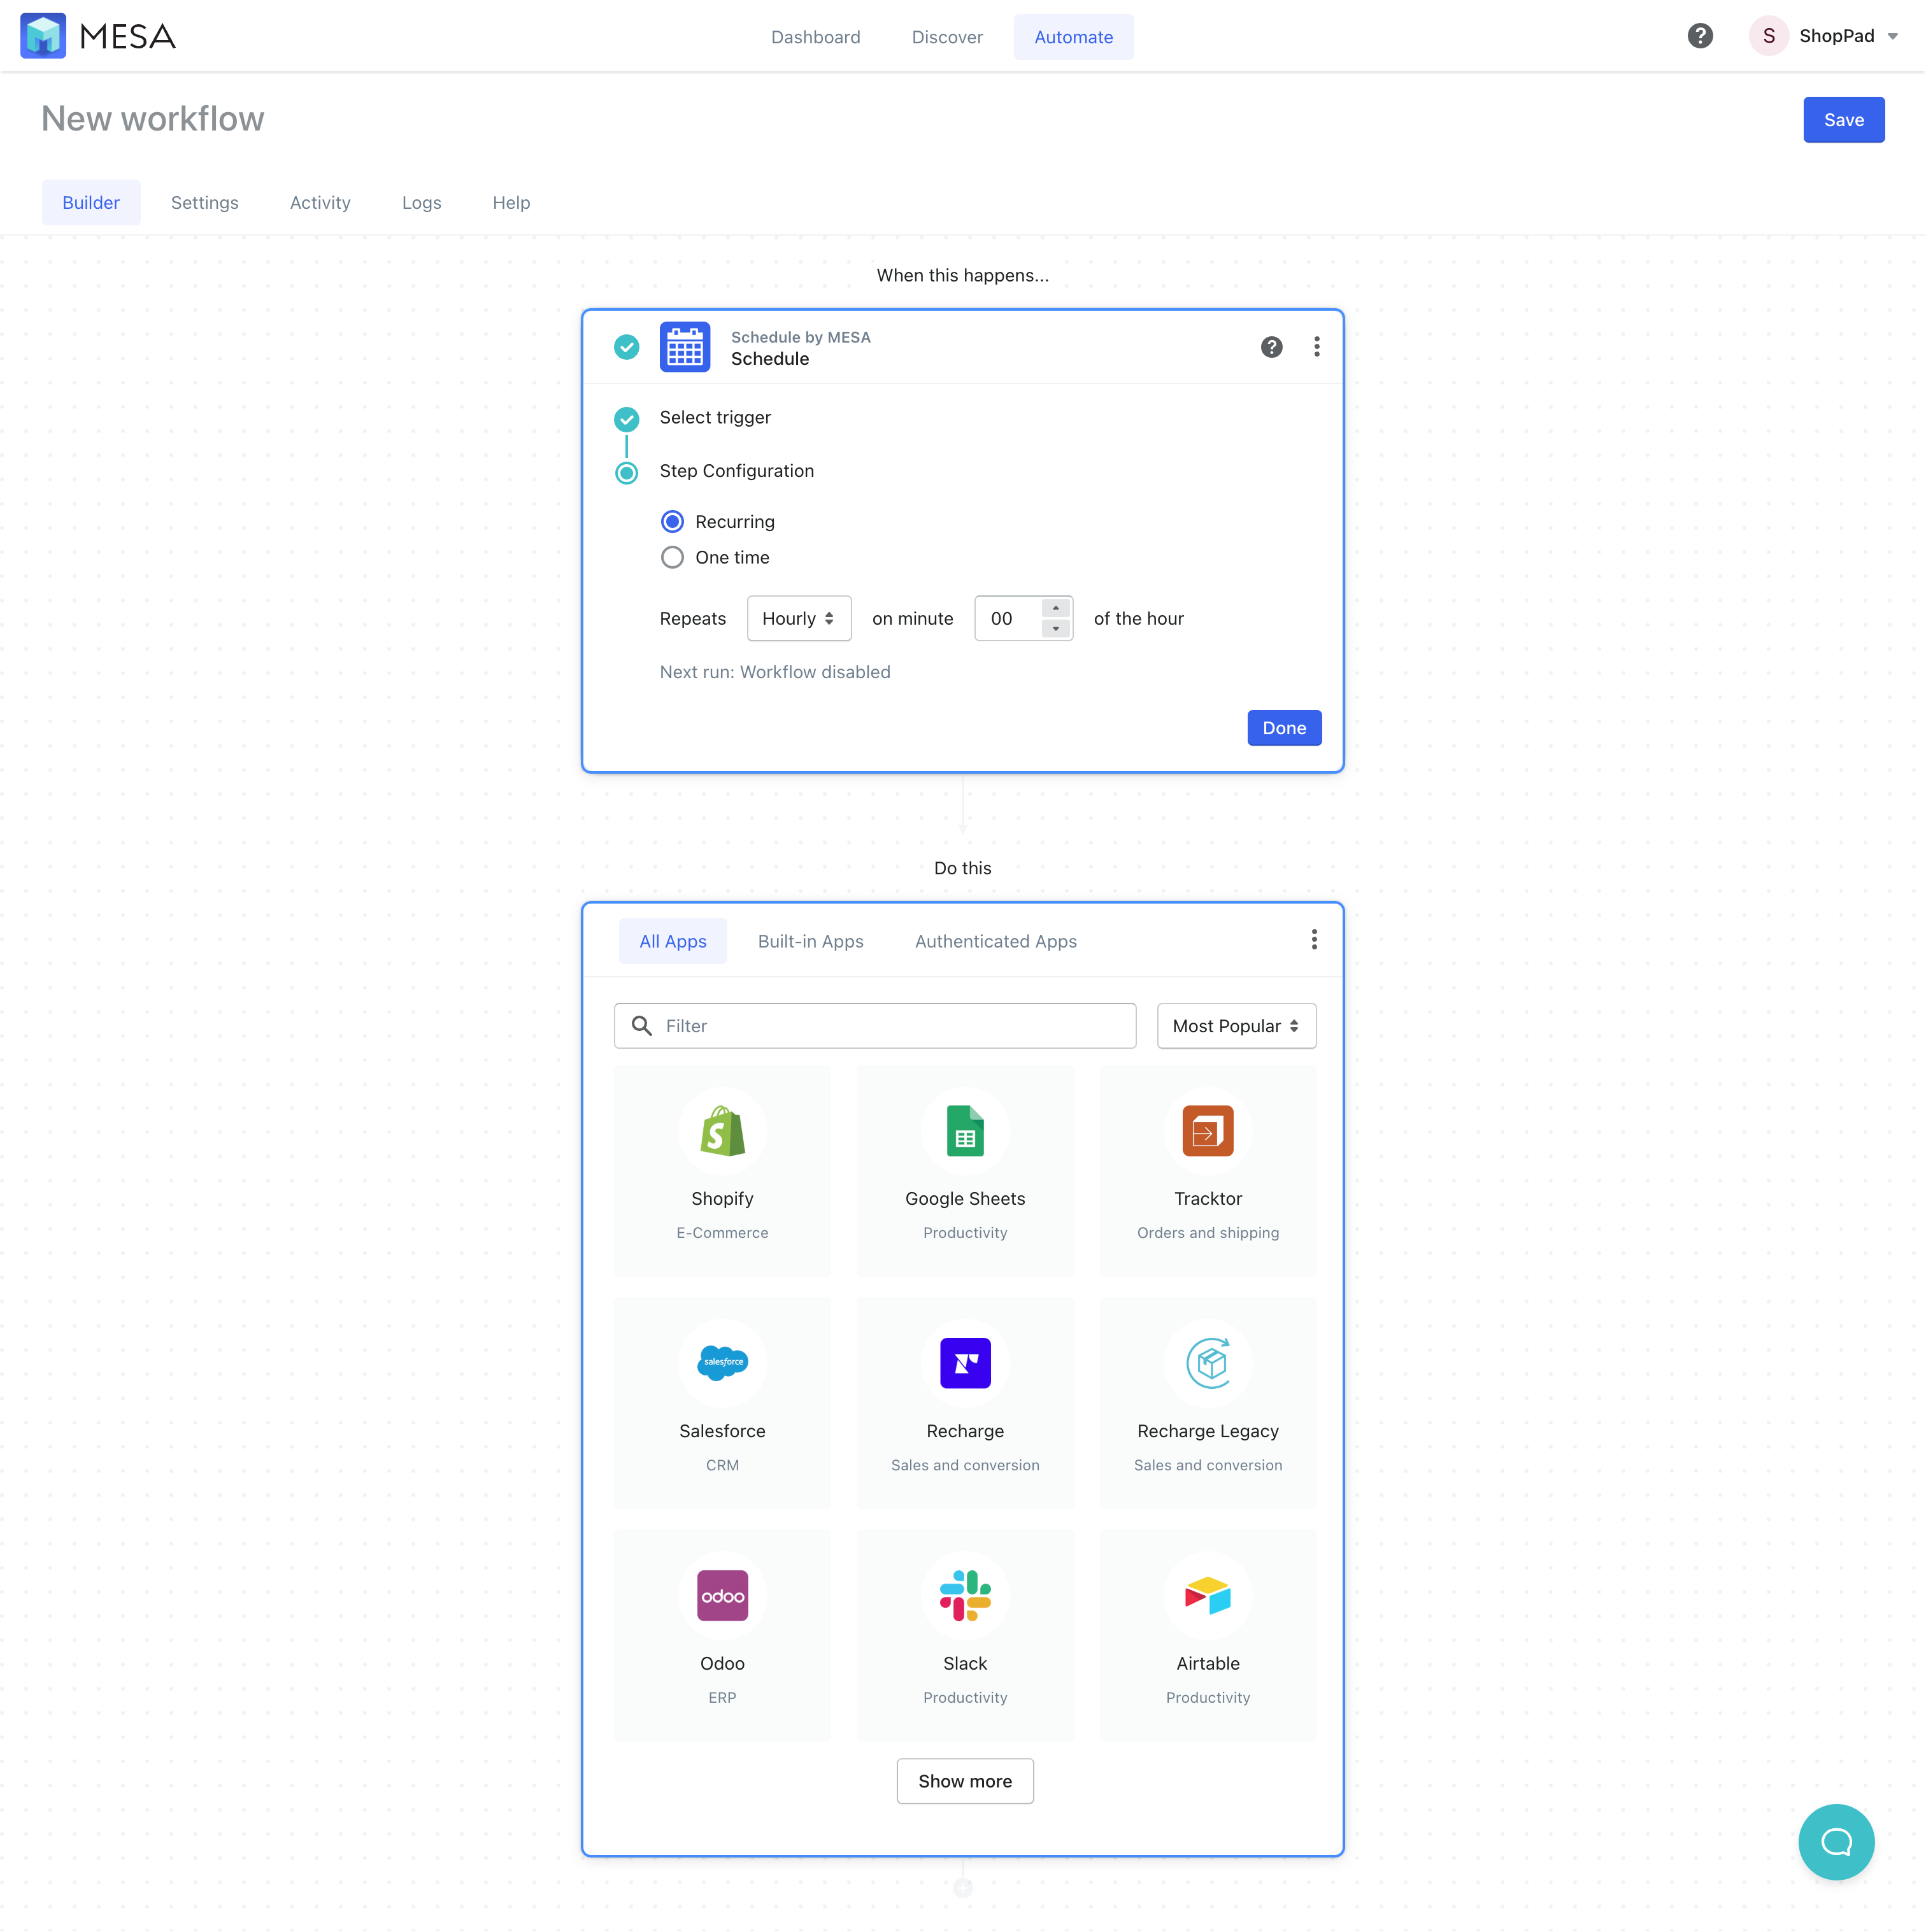
- Now, we’ll make another new workflow using the Schedule by MESA app
Depending how often you plan to make changes to your Google Spreadsheets, you can change the frequency interval. For this example, we’ll leave this to run Hourly.
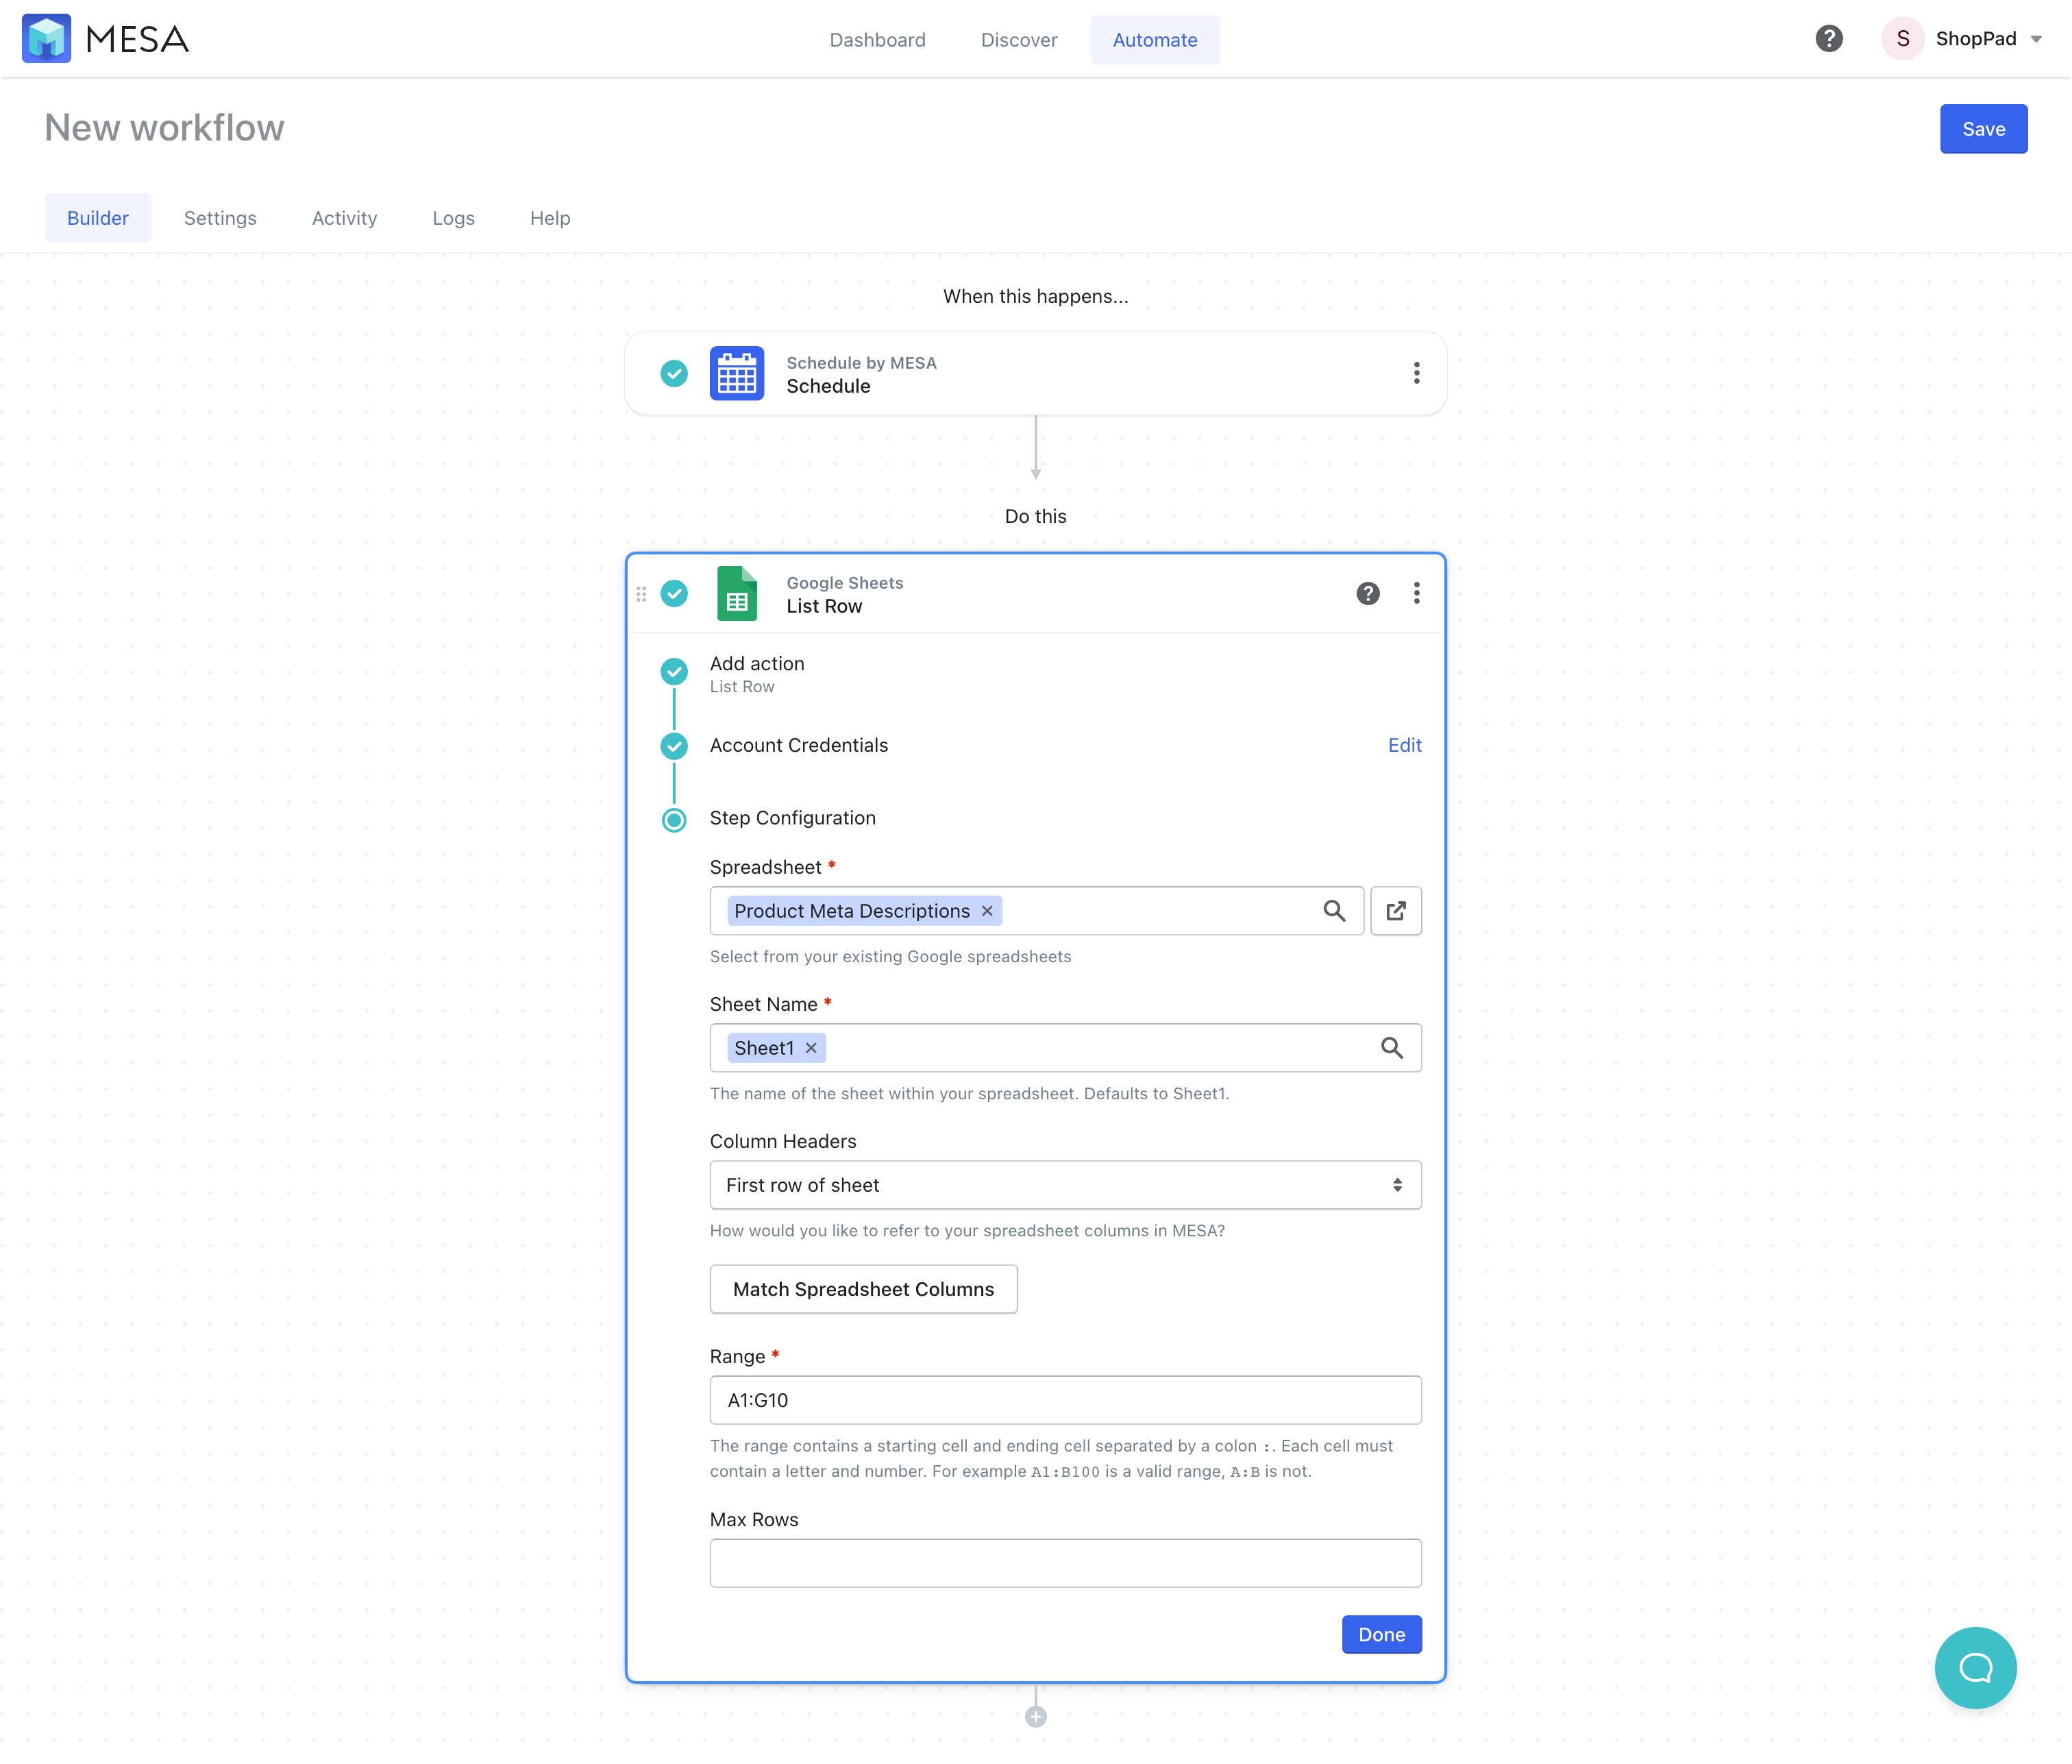
- Next, add the Google Sheets List Row action to your workflow
Using the Step Configuration, choose the Product Meta Descriptions spreadsheet that we created in the last workflow. Select Sheet1 for the worksheet then, under Range, we’ll enter A1:G10 to grab the first 10 rows of data.
- Next, add the Loop by MESA steps to your workflow
In the field, Values to loop over, add the following snippet:
{{googlesheets}}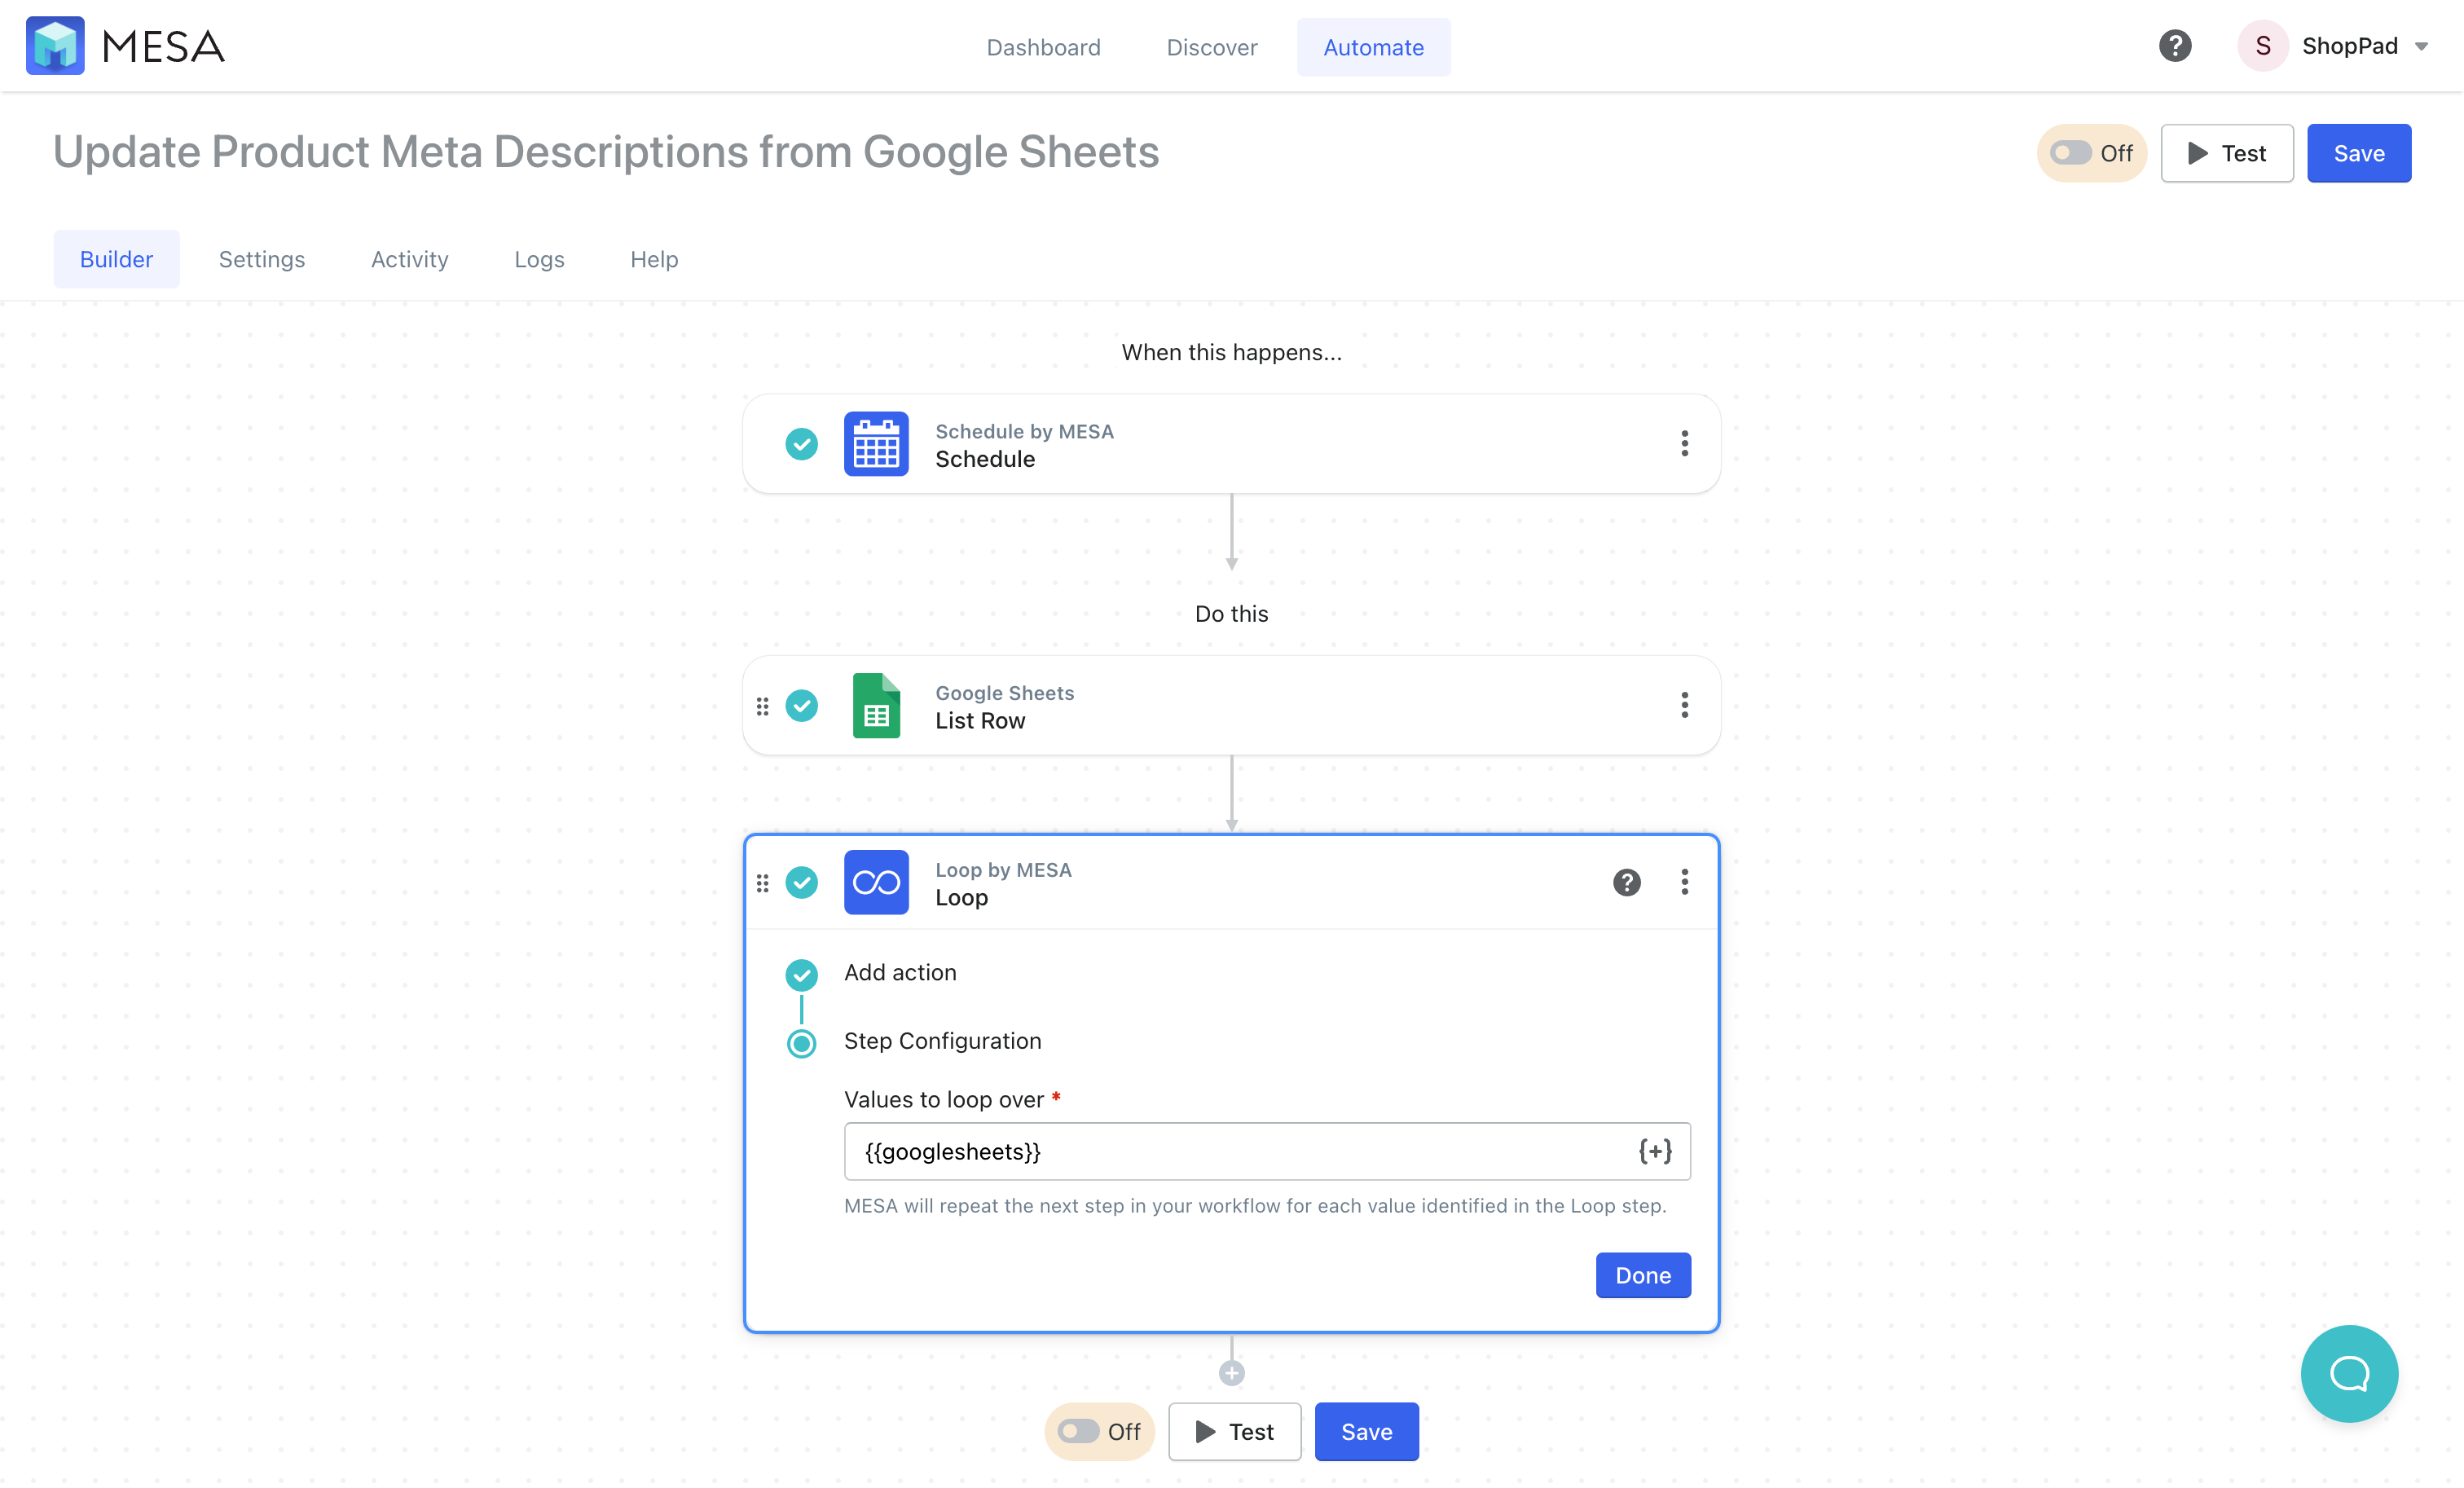
- Next, add the Filter by MESA step to your workflow
Define the filter rules to look at the Loop step field “Status” column
{{loop.fields['Status']}}to see if it equals “Publish”.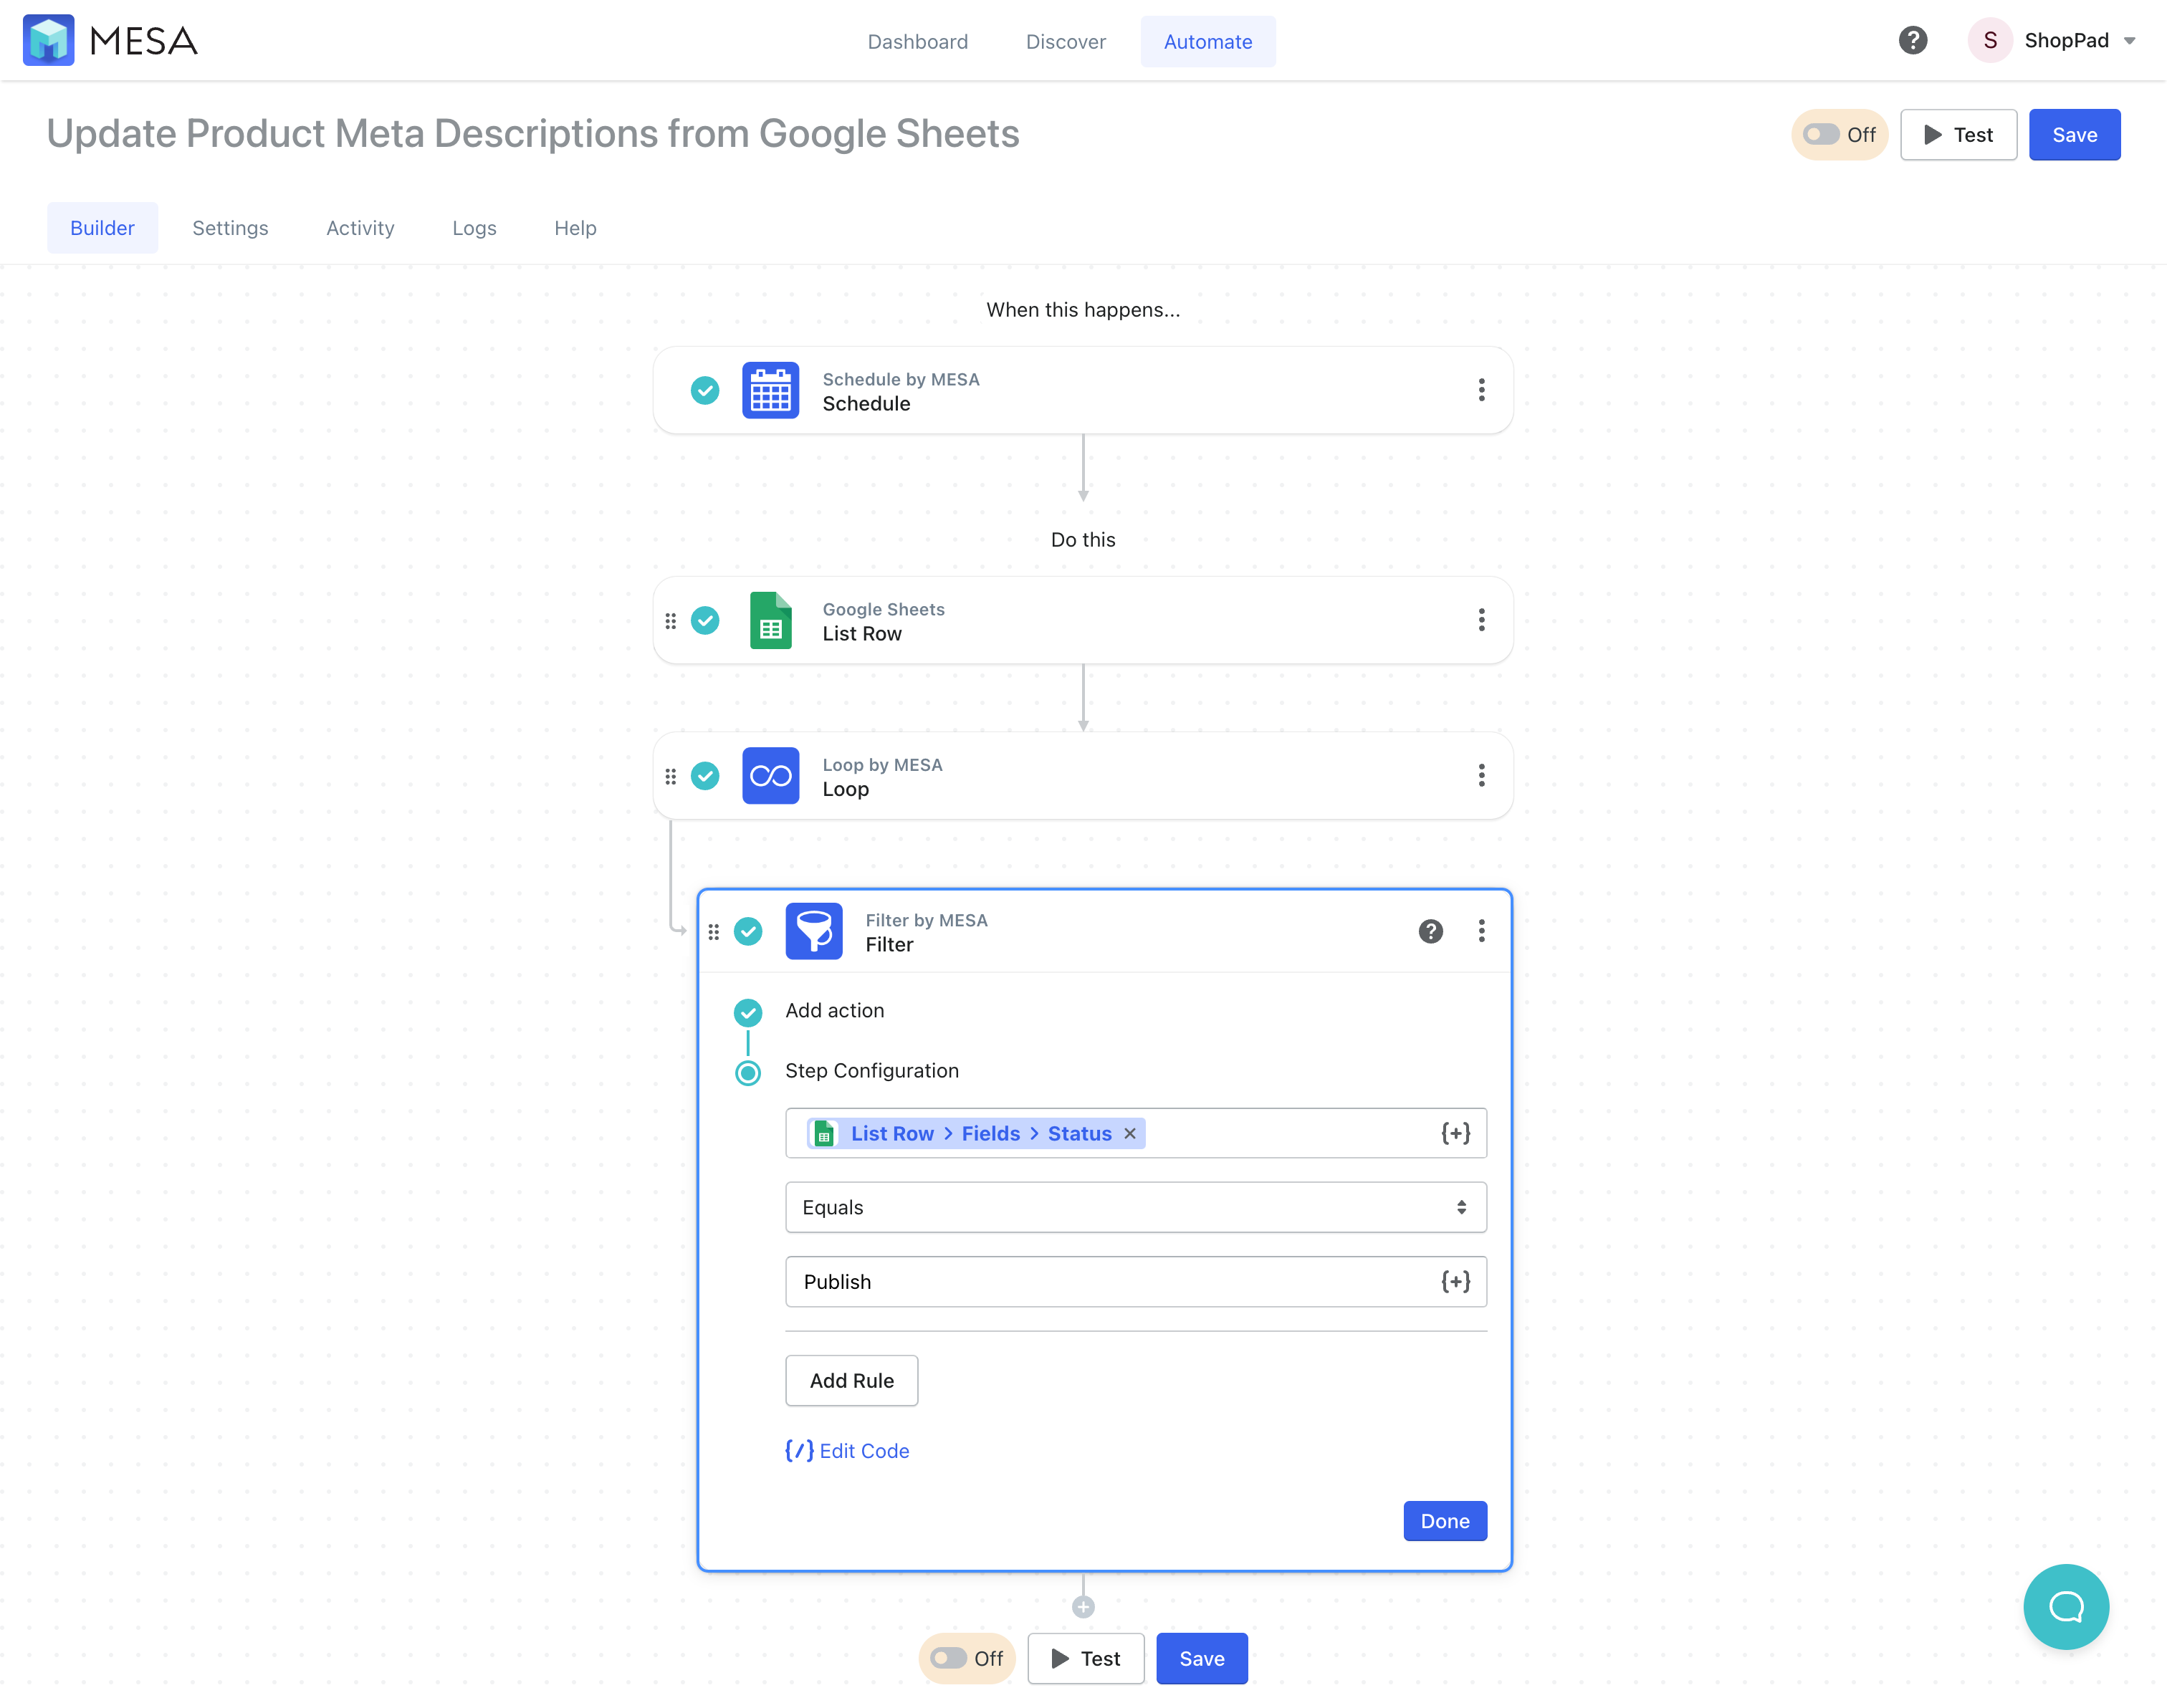
- Next, add the Shopify, Set Product Metafield action to your workflow
We’ll need to define the values from the Loop step to correlate to the right Product Metafield. Following these field values to map the data correctly:
Product ID –>{{loop.fields['ID']}}
Key –> description_tag
Namespace –> global
Type –> Text Field
Value –>{{loop.fields['AI Meta Description']}}
Then, when you’re ready, be sure to Save then, name your workflow some unique. Finally, turn this workflow On to enable it.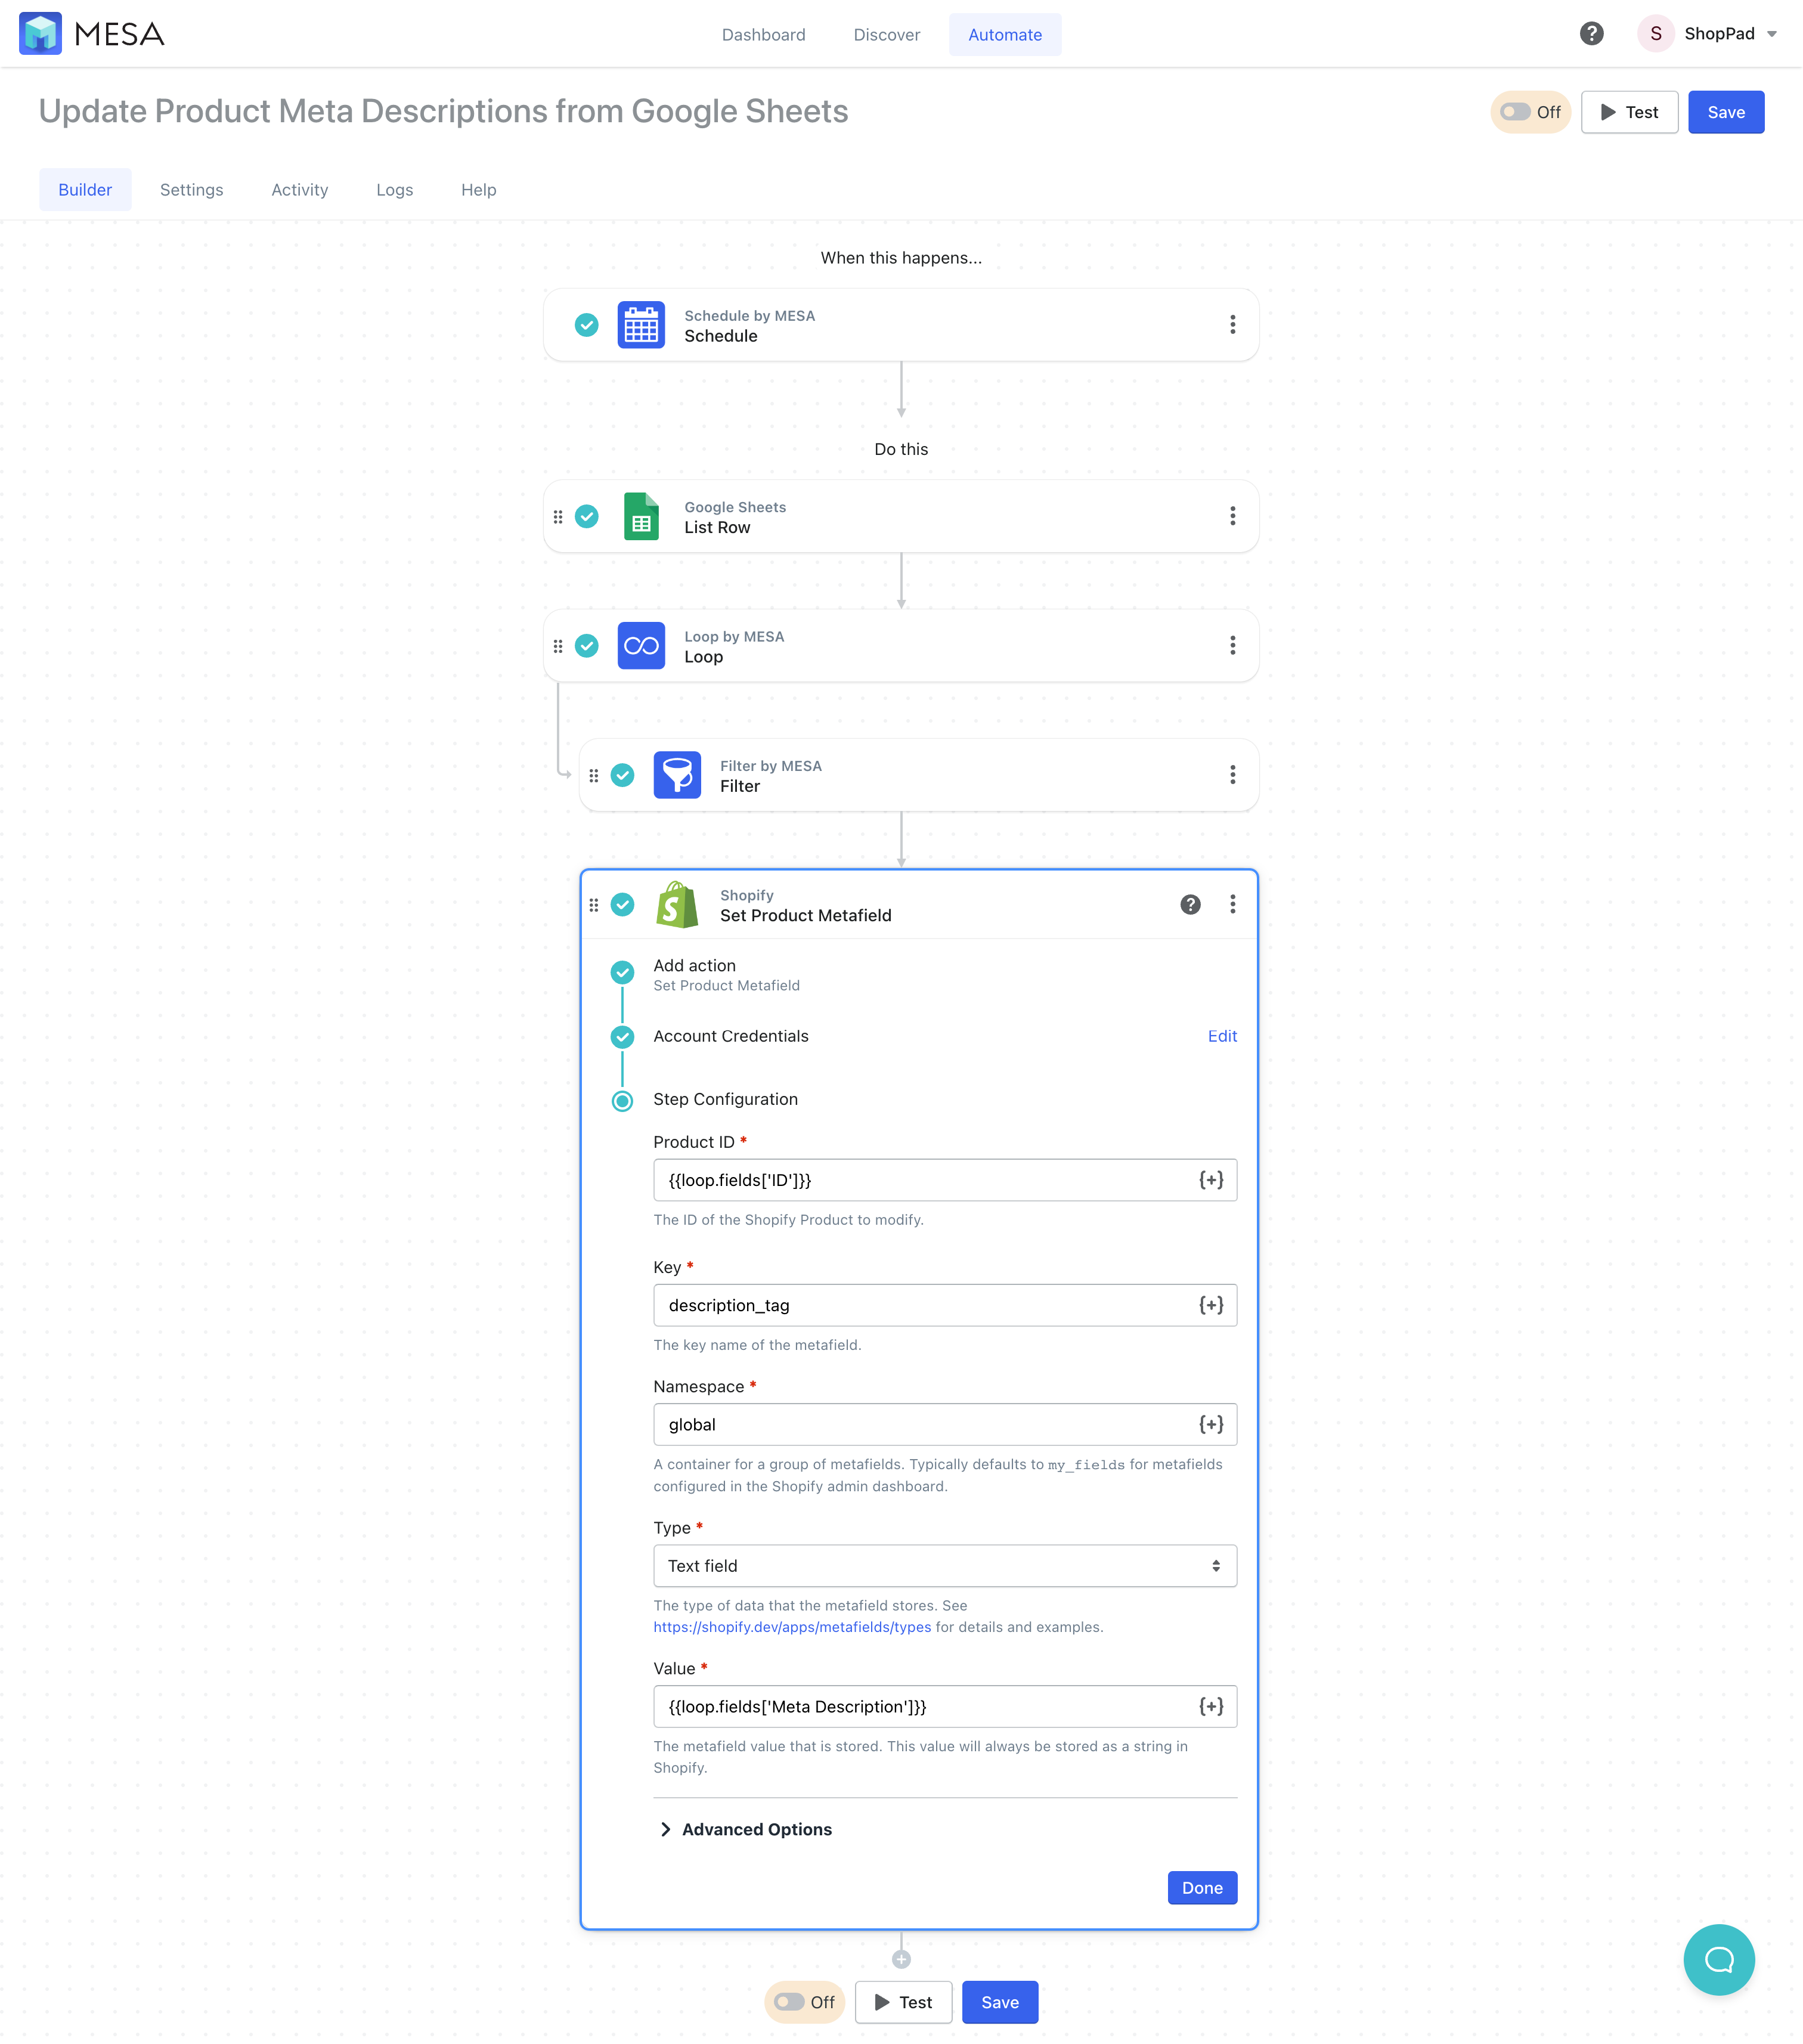
Congrats, you’re done!
You now have two workflows running:
- The first runs every time a new product is created.
- The other runs on a schedule interval you defined.
As a result, you have highly optimized meta descriptions for your product pages!
Tip & tricks for writing product meta descriptions
Writing effective product meta descriptions is an essential aspect of ecommerce success. They can significantly influence search engine rankings and click-through rates. Here are some of the best tips and tricks to help you create compelling meta descriptions for your products:
Focus on relevancy
Ensure that your meta description accurately reflects the product’s features and benefits. Include relevant keywords naturally, without keyword stuffing, to improve search engine rankings. Make it easier for potential customers to find your product.
Keep it concise
Search engines typically display around 155-160 characters of a meta description. So, aim to keep it within that range. Be succinct and use clear, descriptive language to convey the key information.
Highlight unique selling points
Emphasize what sets your product apart from the competition. This could be its superior quality, affordability, sustainability, or any other unique feature that makes it stand out.
Use a strong call-to-action (CTA)
Encourage potential customers to click on your listing by using a compelling CTA. Try phrases like “Shop now,” “Discover more,” or “Get it today.”
Utilize numbers and symbols
Including numbers, percentages, or symbols (e.g., “&,” “+,” “-“) can make your meta description stand out in search results and catch the attention of users.
Write for your target audience
Tailor your language and tone to appeal to your ideal customer. Use words and phrases that resonate with them and showcase the benefits they care about most.
Avoid duplicate content
Ensure that each meta description is unique. This helps avoid search engine penalties and to provide a better user experience. This will also help prevent confusion among customers and create a more cohesive brand image.
Test and optimize
Monitor the performance of your meta descriptions by tracking click-through rates and other metrics. Experiment with different phrasings, keywords, or CTAs to see which ones yield the best results, and optimize accordingly.
Follow these tips and tricks to craft product meta descriptions that effectively showcase the value of your products. And, they’ll entice potential customers to click through and explore your ecommerce store.
Workflow wrap-up
In conclusion, the method outlined here offers a transformative approach to crafting product meta descriptions, leaving Shopify’s default text in the dust. Additionally, by harnessing the power of OpenAI, you can generate captivating and relevant descriptions that will improve your product listings, while Google Sheets integration ensures a smooth review and approval process.
This MESA workflow epitomizes working smarter, not harder, in the world of ecommerce.
As a result, you will not only save valuable time and resources but also enhance your store’s overall performance. Embrace the future of ecommerce management with confidence, knowing that this efficient and effective method will elevate your operations to new heights.
So, take the leap and revolutionize the way you handle product meta descriptions today, and reap the rewards of a more streamlined and successful online store.


